DIGITAL - art, video, and photo editing
/ PAINT SHOP PRO PHOTO X2
Formatting and creating a new image.
This tutorial is for Paint Shop Pro Photo X2, it will teach you how to format and create a new image.
Open PSP, you now need to go to the upper left corner - File - new (or control+N)
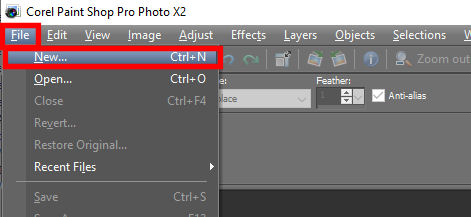
You should then be looking at the "new image" popup window (shown below).

The areas I have highlighted are the ones I mostly use, Width, Height, and Units (for me it is usually inches or pixels.), and sometimes Resolution (not highlighted). For example, if you plan on printing your work using a standard size printing paper (8 and a half inch wide by 11 inches high), you might want to make sure that your Units are set to inches, and set the width to 8.5 and the height to 11. This way the image will actually be formatted to 8.5 x 11 which might be important to you for printing iron-on stencils for T-shirts. But if for example you plan on creating an overlay or graphic for a full HD video, then you should set your Units to Pixels (think of pixels as the smallest building block of a digital image), and set your width to 1920, and your height to 1080 (also don't forget that there are some presets listed at the top where the preset button is located).
The other variable I mentioned using some is the "Resolution" setting. I tend to keep it at or above 300. I guess the best way to think of this is like a "dots per inch" kind of thing. The higher the number the smoother the lines are and less "aliased" I guess would be the word. But keep in mind the bigger the image the greater the quality, but also the greater the file size. And the options beside resolution are either Pixels per Inch or Pixels per Centimeter.
Image Characteristics
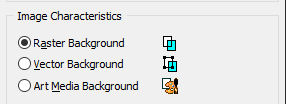
Here the options are Raster Background (default), Vector Background, or , Art Media Background. I find that I have never had to use anything other than the "Raster Background" choice, and if I need to add a vector layer that can be done very easily.
Color depth
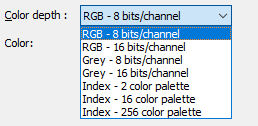
There are several options here that you might need or not, but I find myself mostly using the default "8 bits/channel" option.
Color and Transparent
I think the majority of the time you are just going to want the simple default white background, but if you need another color then just hover your mouse over that white square and when it becomes a dropper either right click for simple color changing options, or left click for the full color changing options. And you might even just want a transparent background, in which case just check the box I highlighted.
Press "Ok" at the very bottom once all your options are set, and your new canvas / image will be created.