This tutorial is for the Unreal Engine 4.27.2 which to my knowledge is the final version of UE4. The reason I am using this for this tutorial and not version 5.xx is because in 5 they completely changed how animation works and removed the retargetting manager. It might still be able to use Victortia 4 or other Daz3d characters, I just am not familiar with that new system yet, but I know this works. And will likely easily export from a UE4 to a UE5 project without trouble.
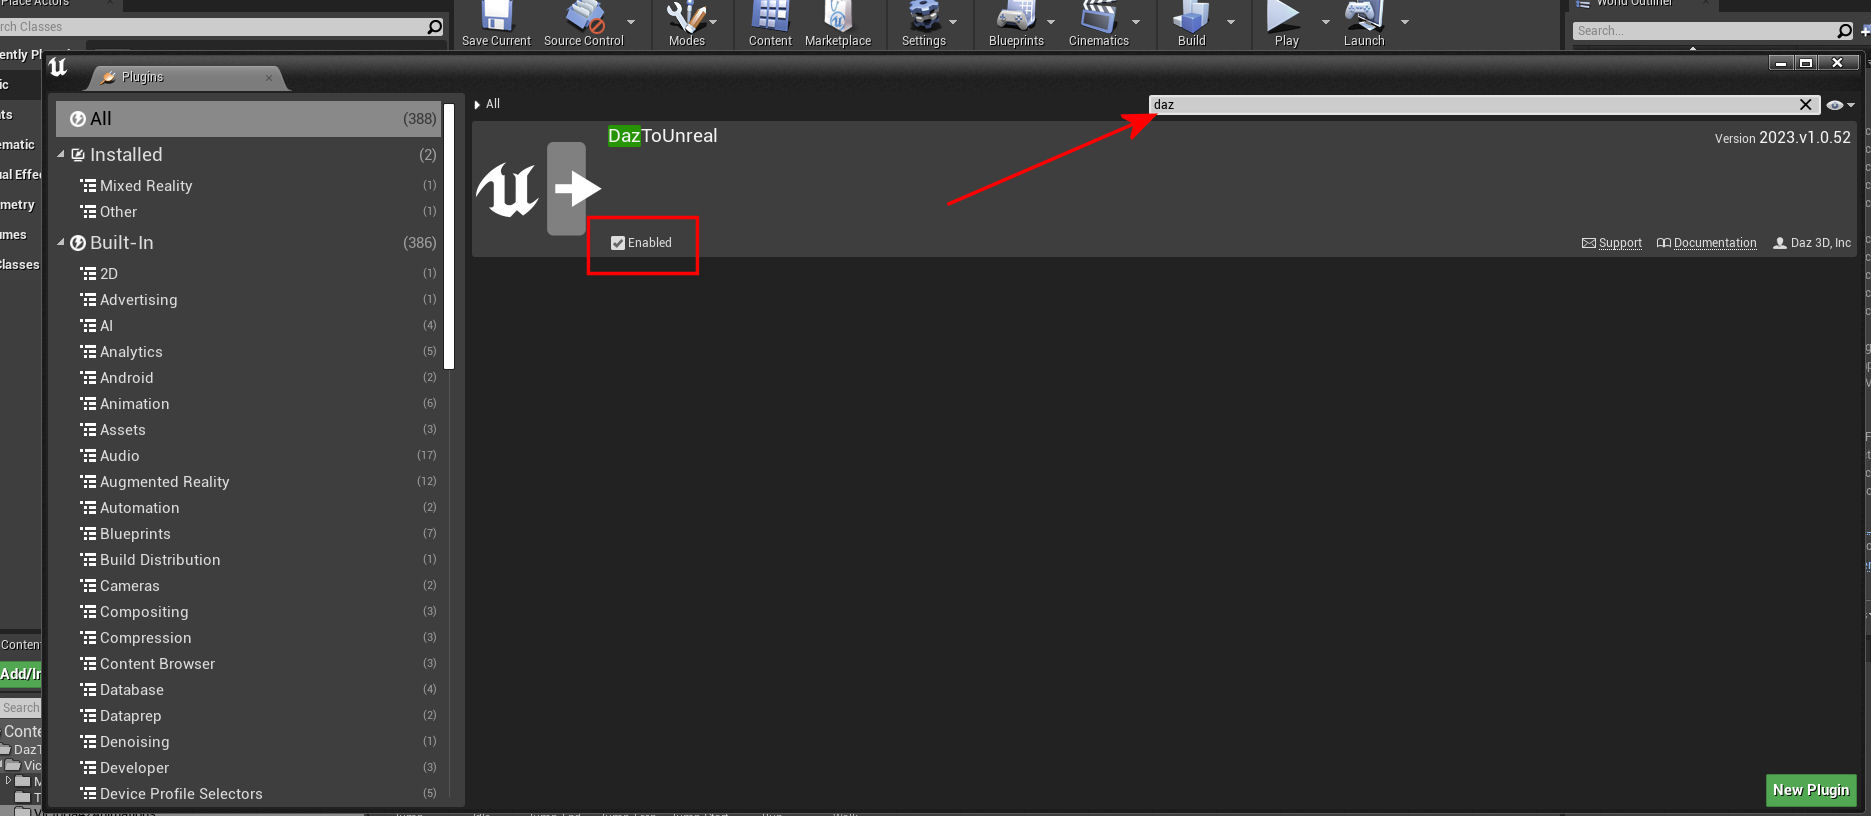
This tutorial will assume you have already installed and have working the Daz to Unreal bridge. But remember you do have to also activate the Unreal plugin. In your Unreal Engine 4.27.2, with a project open go to Edit - Plugins - and type "Daz" in the search bar. It should come up if it installed correctly. Make sure the box is ticked. If so you can go on to the next step, if not, when you tick the box you will see a popup down low asking you to restart the program now.

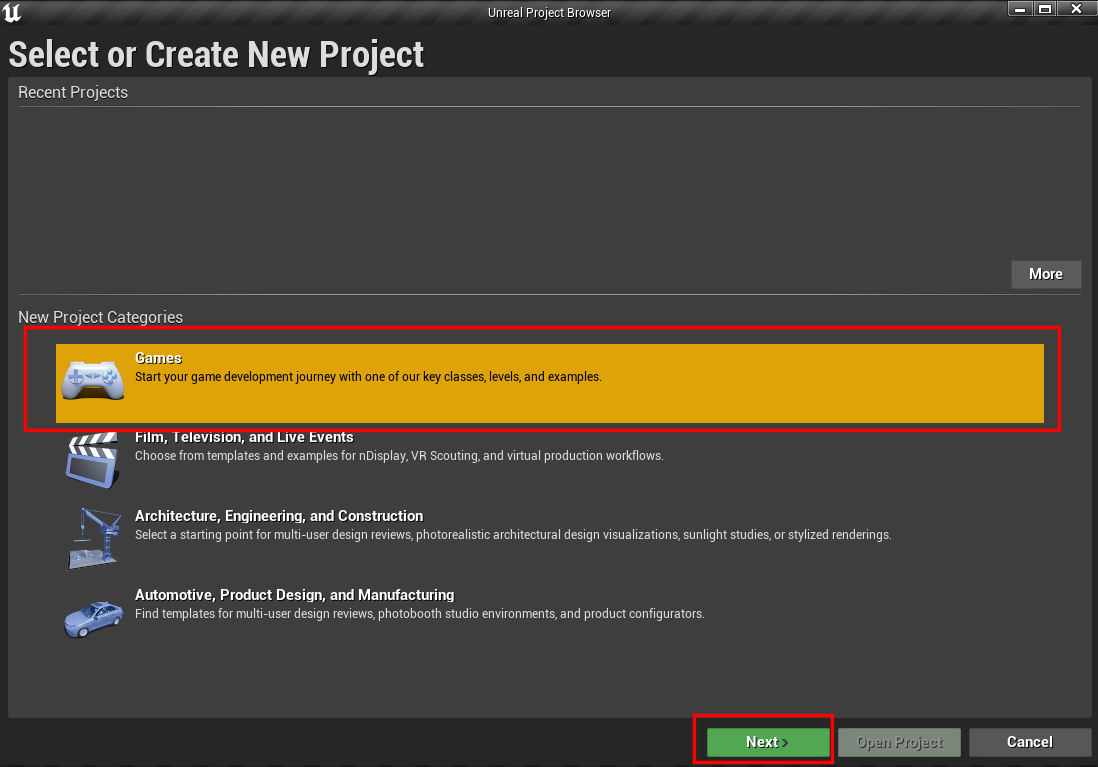
(Part 1) - Daz3D to UE4 - We will be making a new project in UE4 called "ImportV4". Open UE4, choose "Games", and hit the Next button.
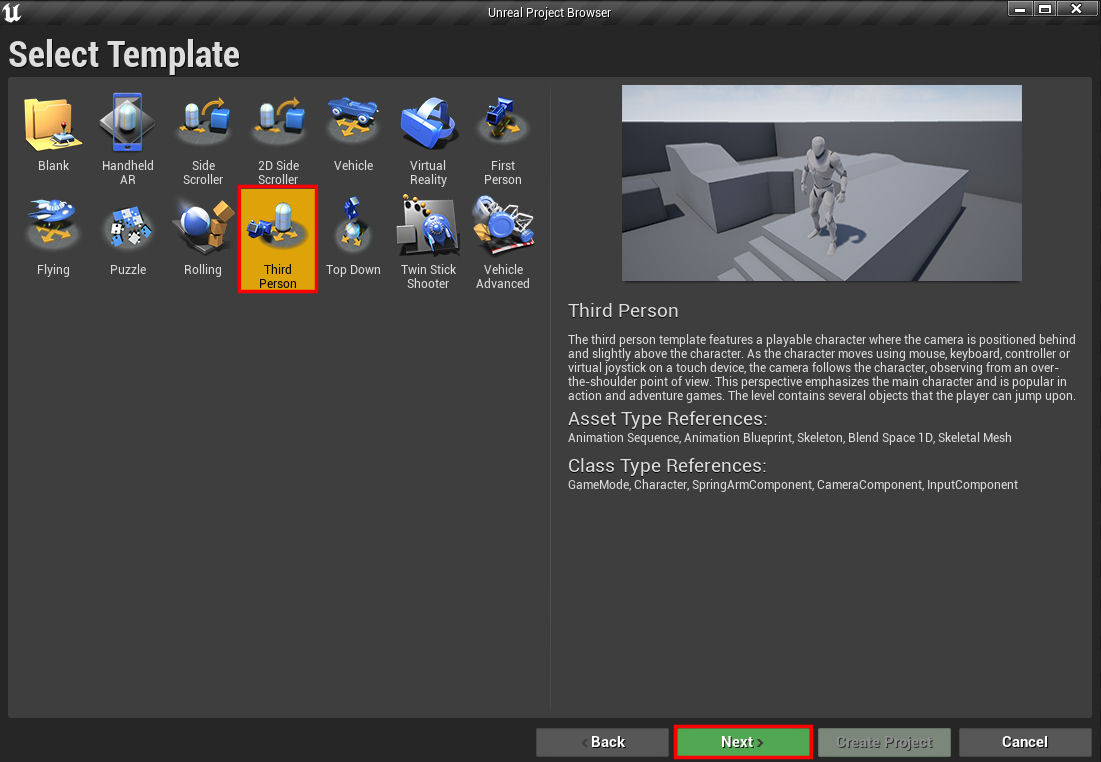
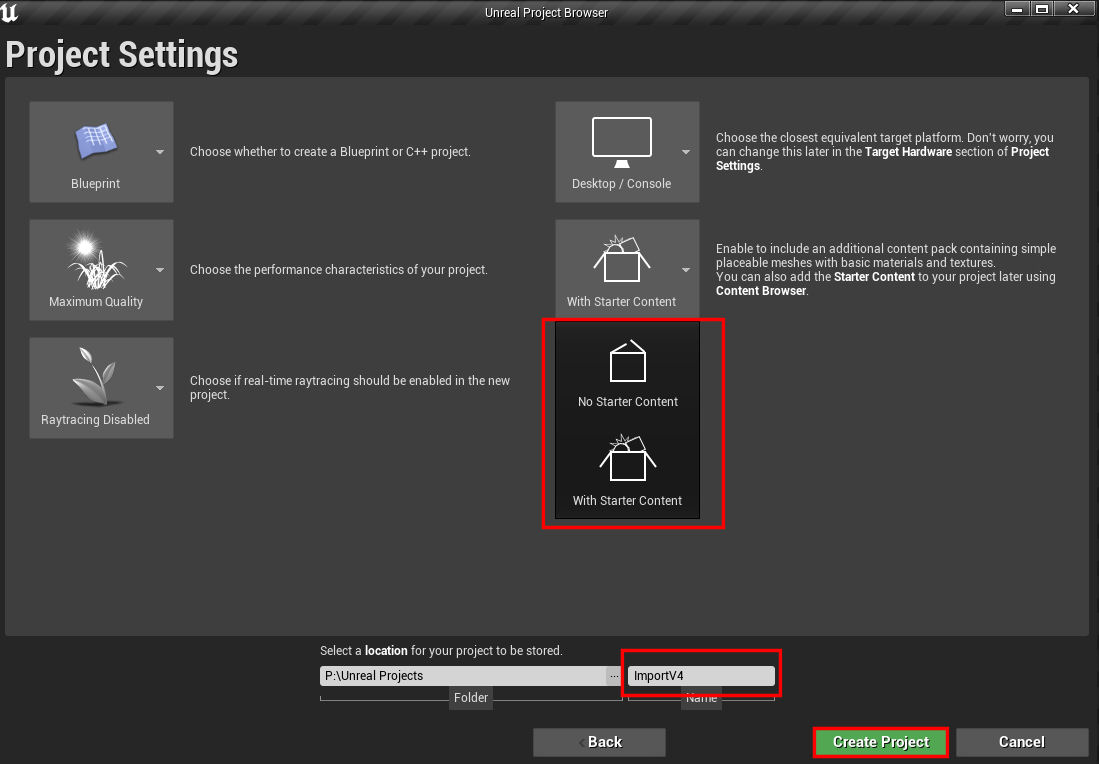
On the next screen choose"Third Person" and hit the Next Button. Choose to either include starter content or not, give it a name like "ImportV4", make sure it will be saving the project to a place you can find it, and press the "Create Project" button.
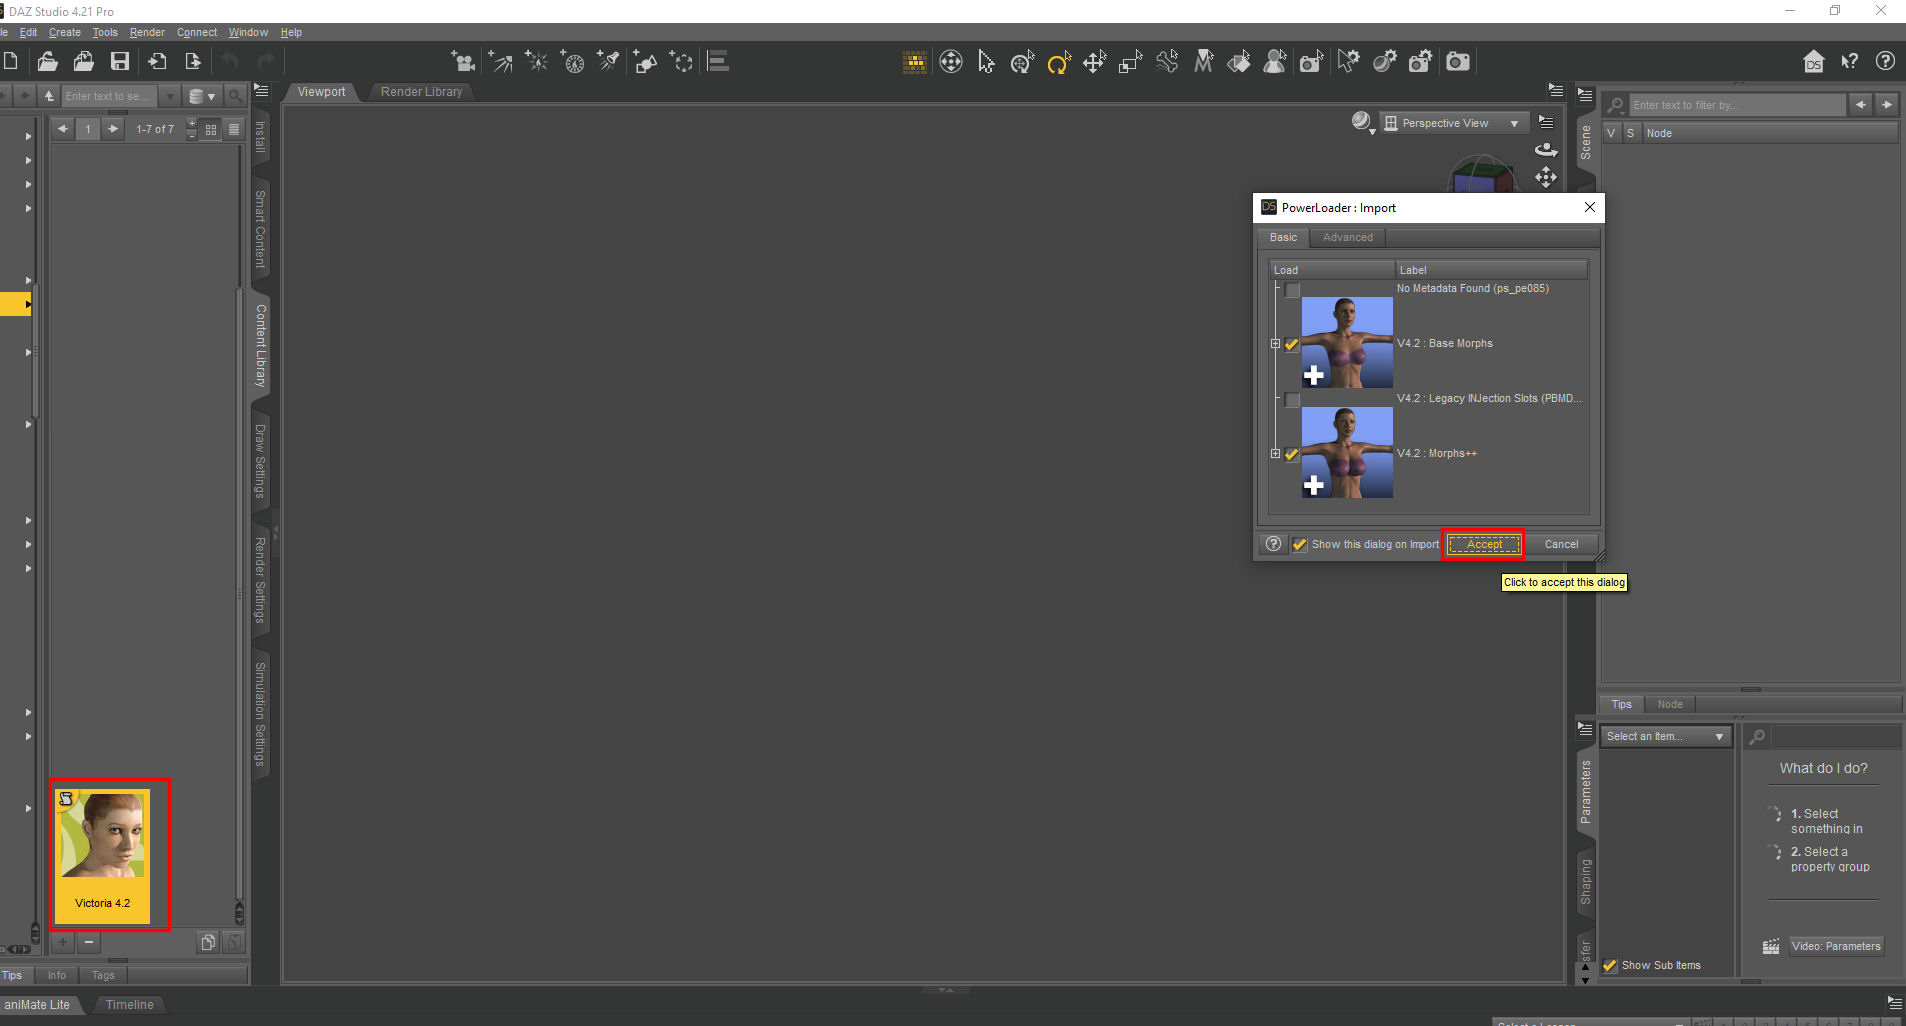
Now minimize UE4 but just leave it on. Open Daz Studio. I am using 4.21.0.5 Pro Edition (64 bit). In your content library tab. Open Victoria 4.2. Mine also loaded up power loader, hit the accept button.
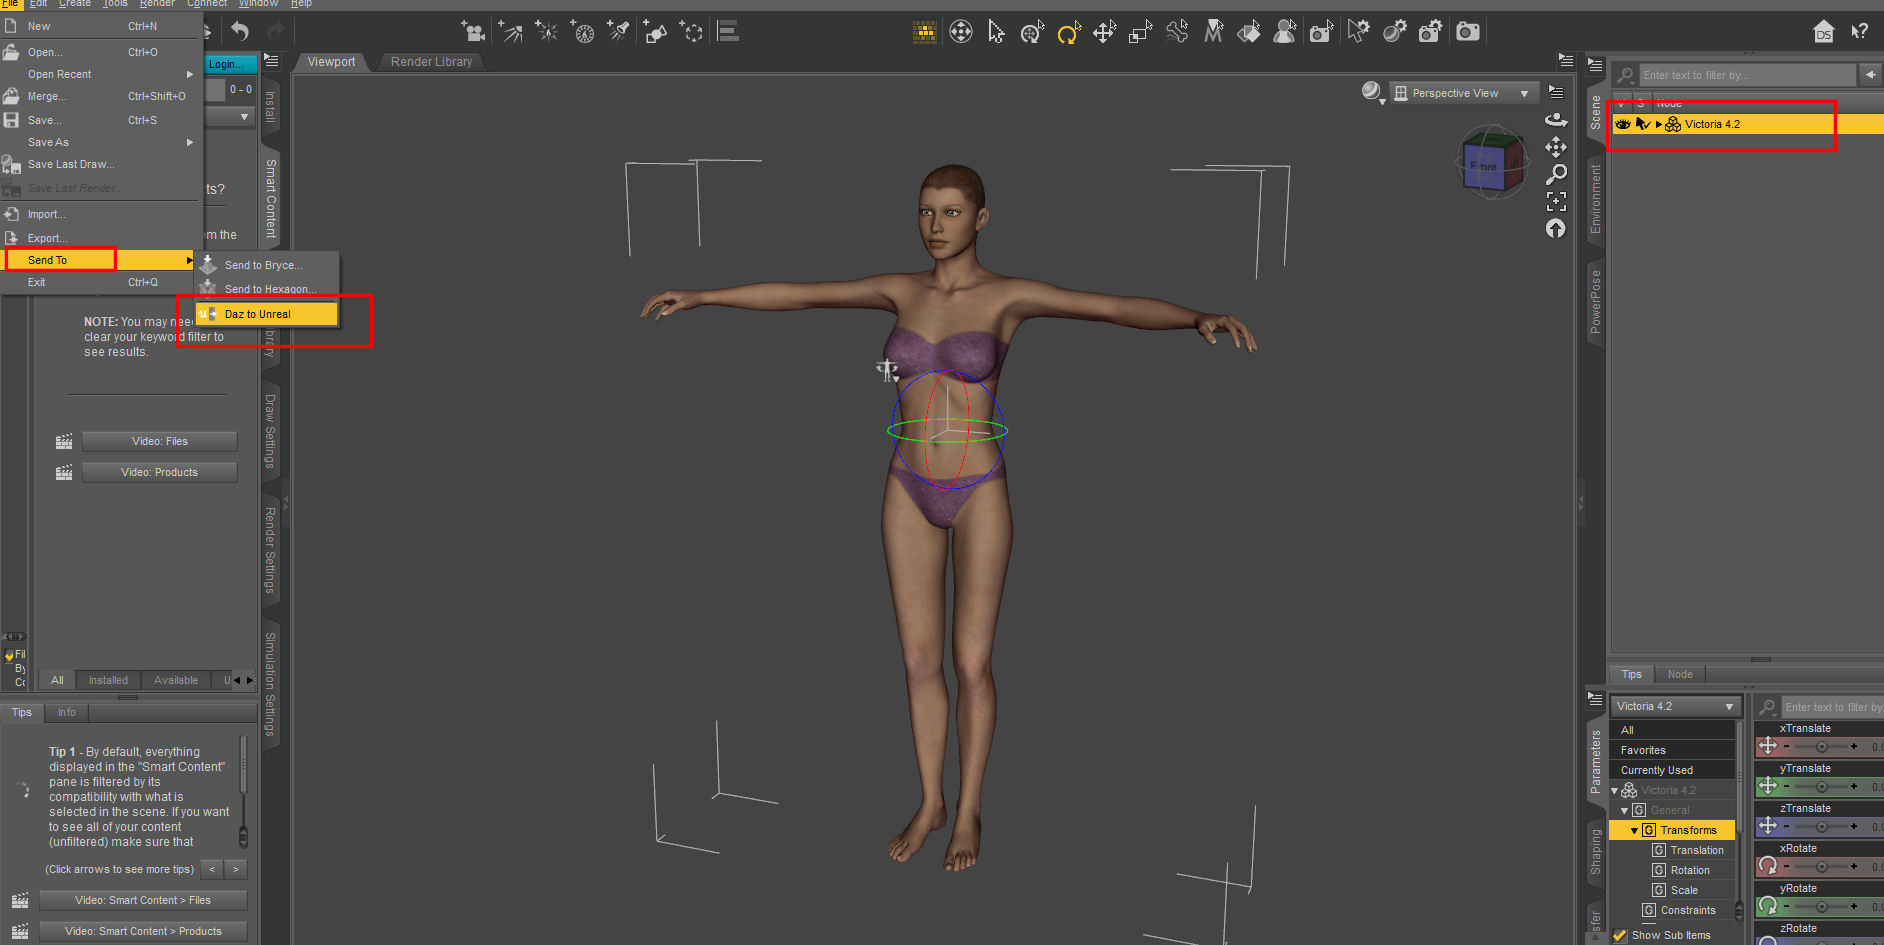
With Victoria 4.2 selected in the scene tab, go to File - Send to - Daz to Unreal.
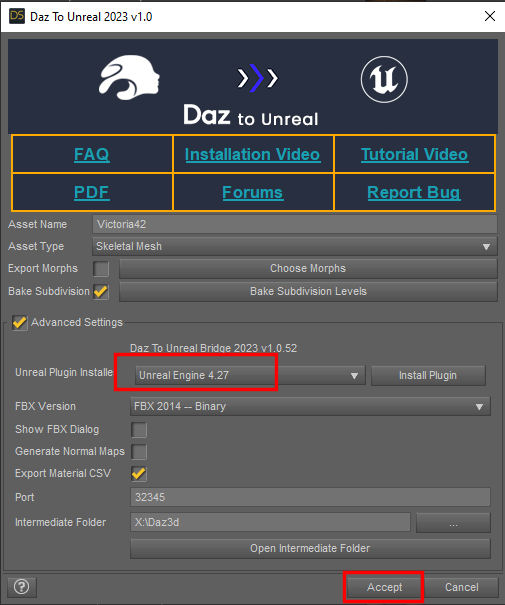
In the popup window tick "Advanced Settings" to see the lower half of the window. Choose Unreal Engine 4.27 as the FBX Version, now press the Accept button. Now just wait, you will see some progress bars as it transfers files to UE4.
You will get a popup and hear a sound when it completes. Now you can either minimize or close Daz3d.

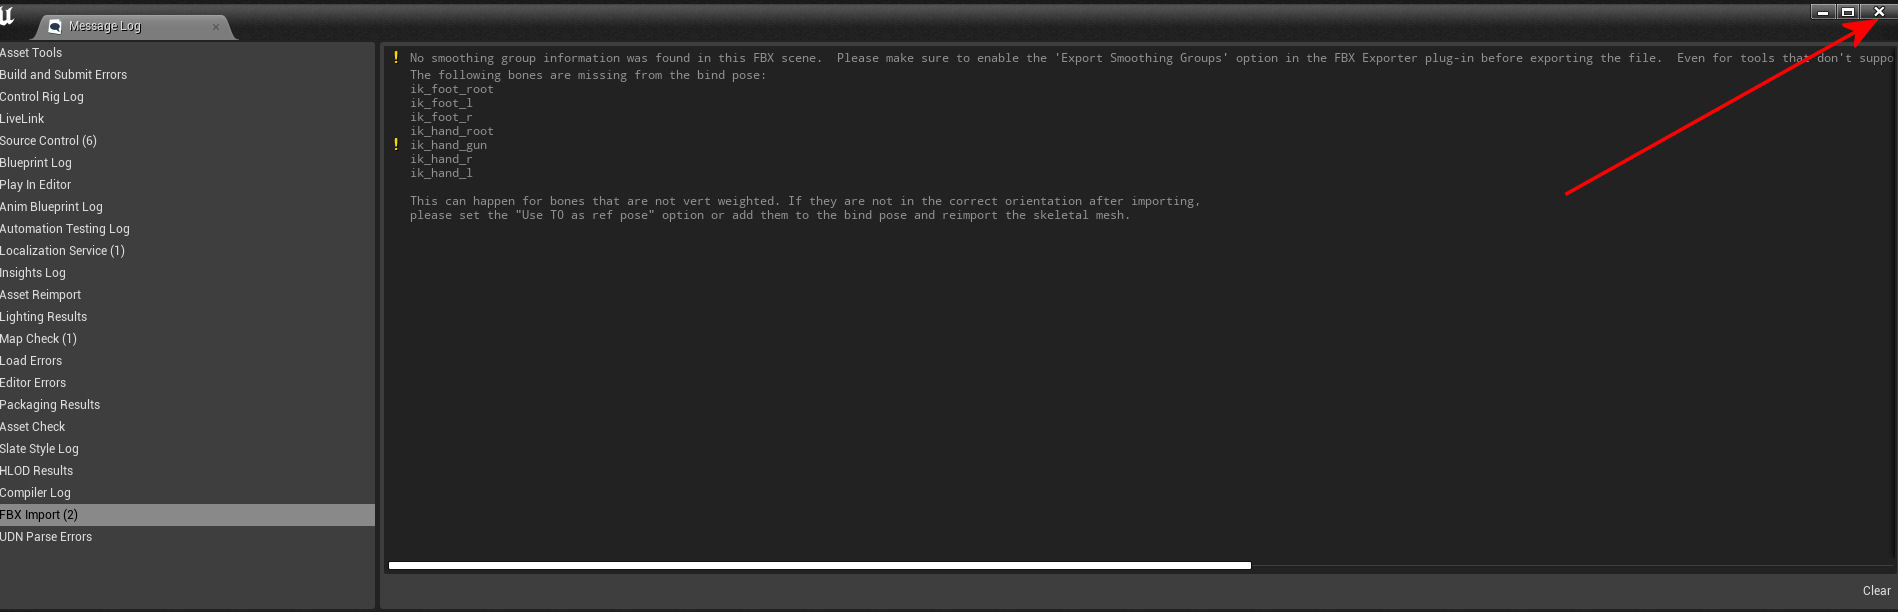
Go back to UE4, You should now be greeted with a message that says some bones are missing, just hit the X and close this message as it is irrelevant to us.
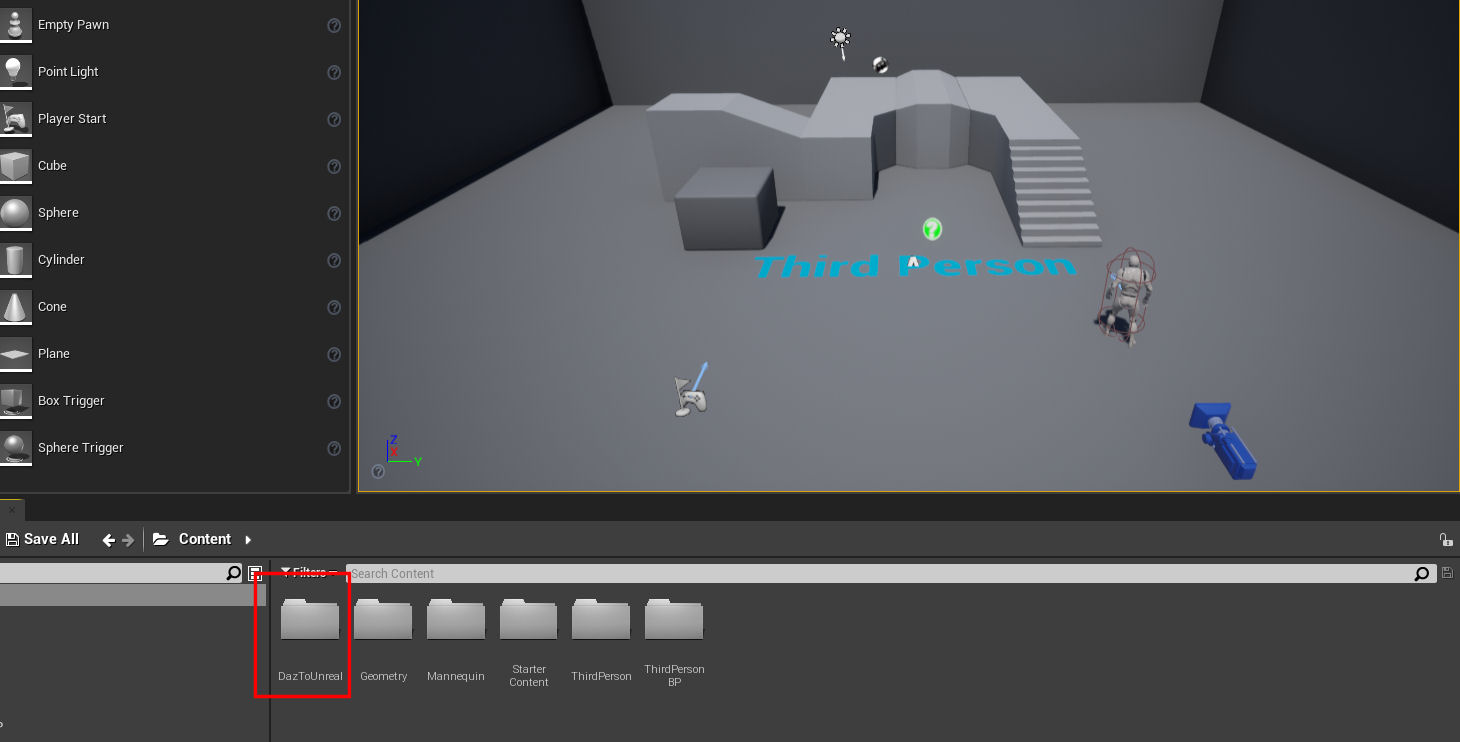
If you look in the content folder, you should find that Daz has created a new folder called DazToUnreal.
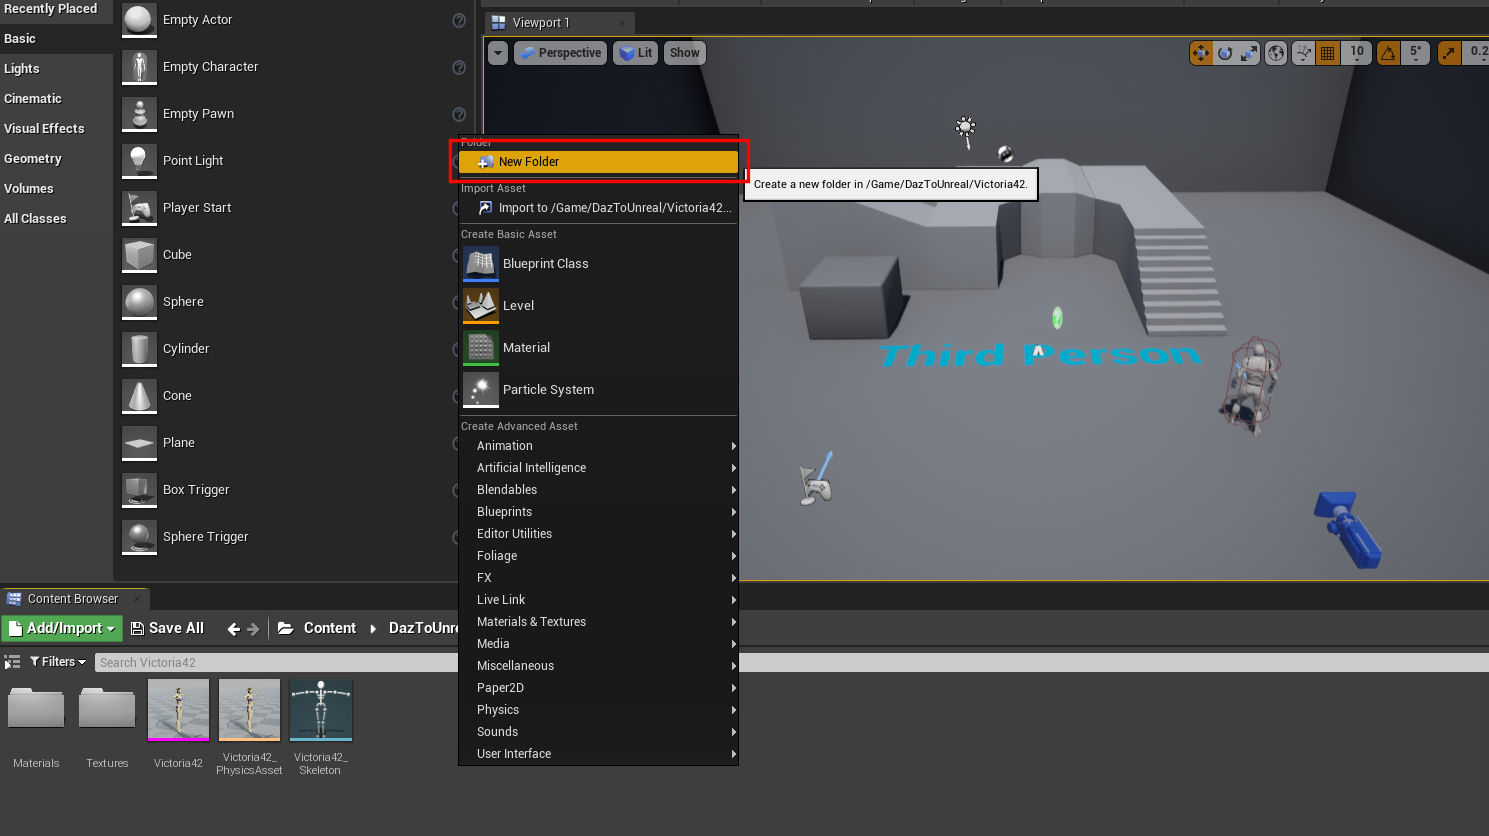
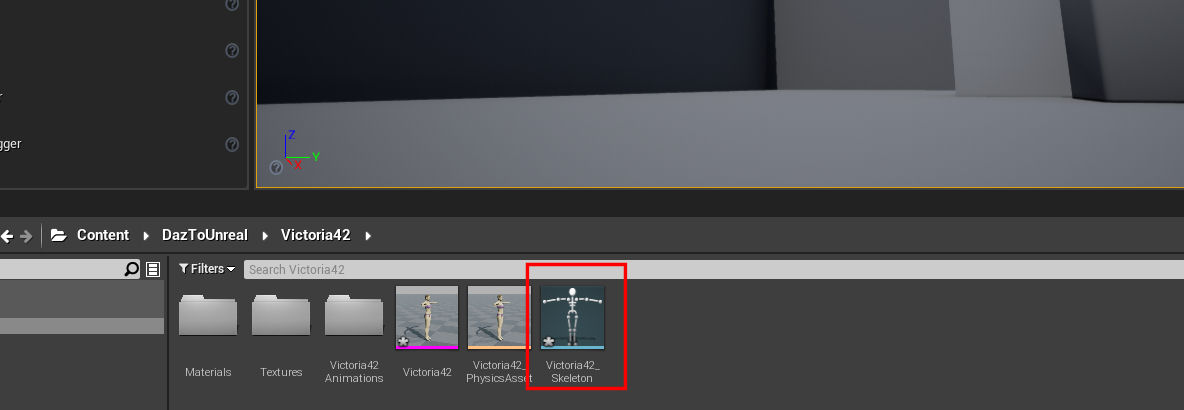
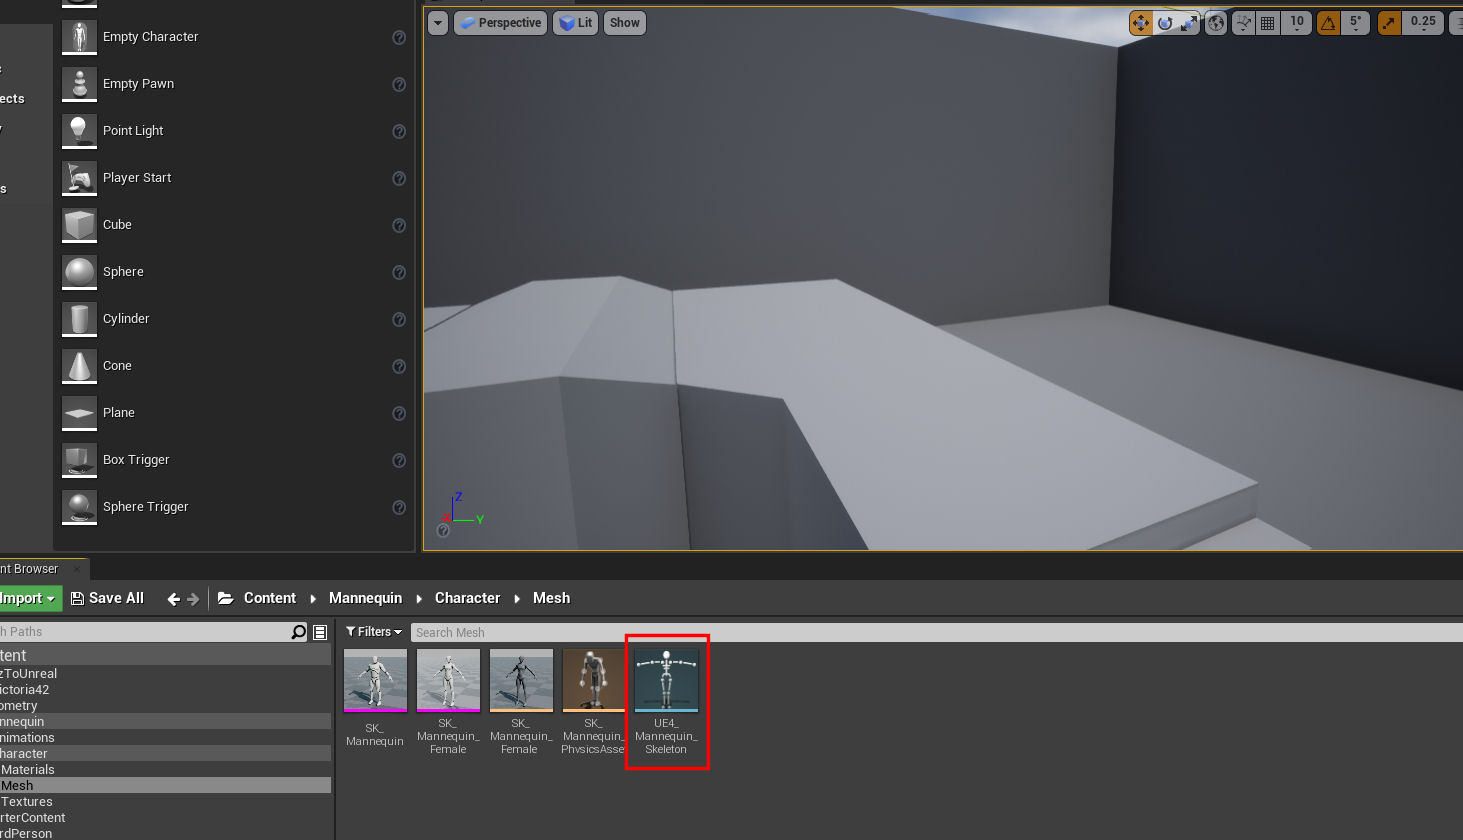
Inside of that will be a Victoria42 subfolder. Inside of that two more folders and three icons, Materials, and Textures, the Victoria42 Skeletal Mesh, the Victoria42 PhysicsAsset, and the Victoria42 Skeleton. Right click an empty space after the skeleton and choose to make a new folder and call it, Victoria42 Animations. This is where we will store our retargeted for V4 animations later.
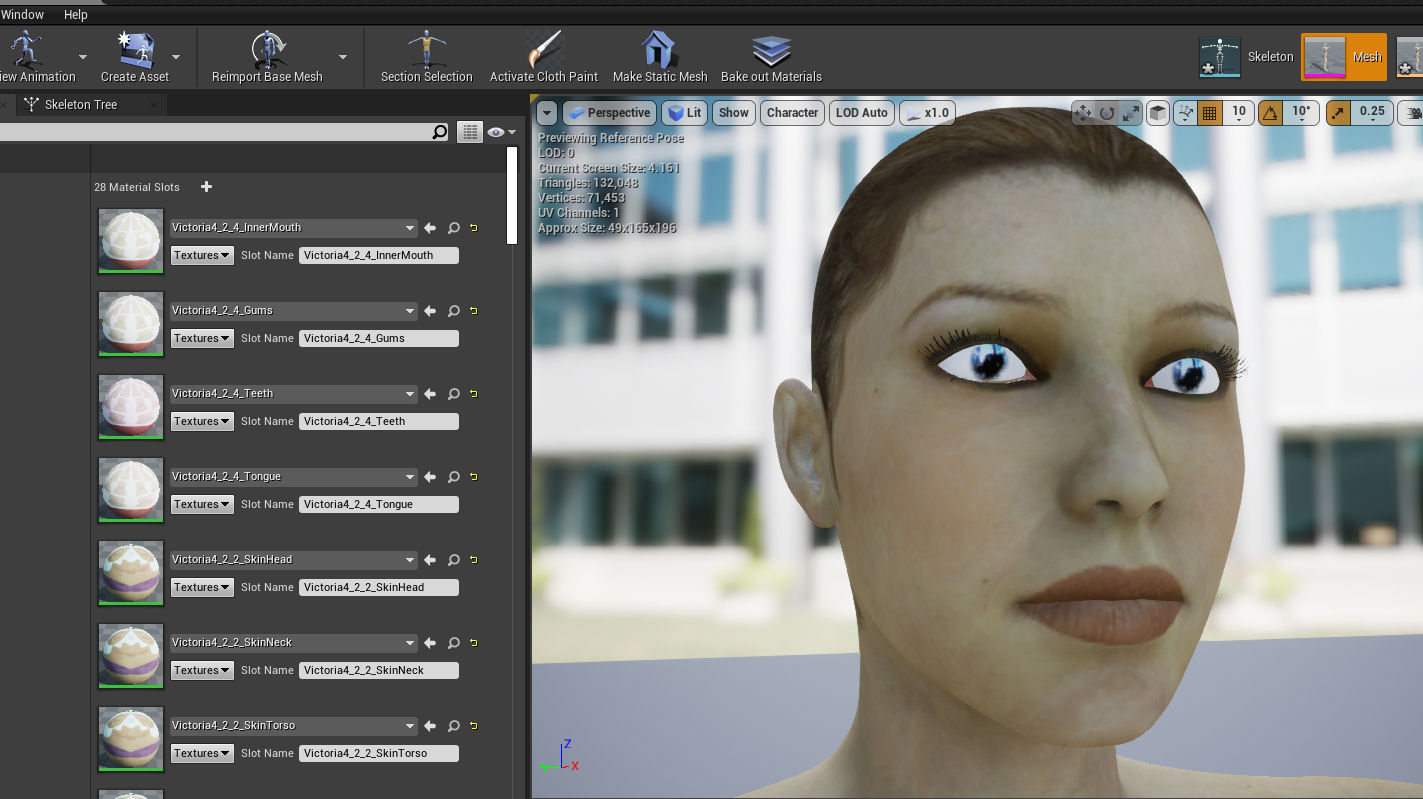
Now go into the Mesh. Try to get close and look at the face. Hold the right mouse button and mouse direction and press the W, A, S, and D keys to navigate around V4. If you find that it is zooming too much and too fast you can change the camera speed in the upper right of the viewport.

Notice the eyelashes. They are having a transparency problem. So we will first fix that.
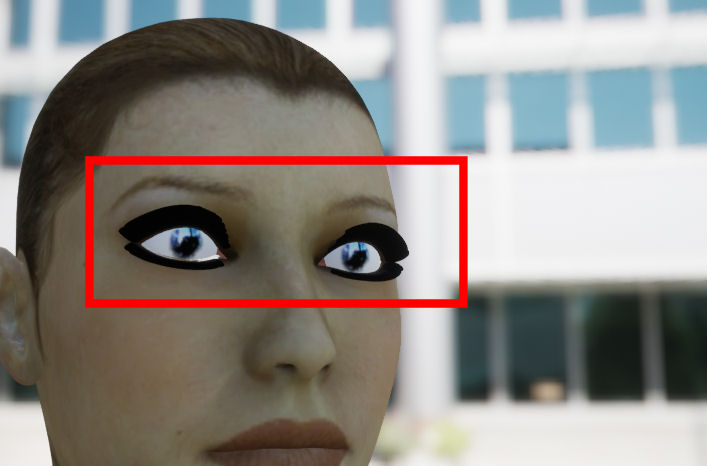
On the left in the Asset Details tab you want to scroll down until you see an almost solid black sphere, for me it is called "Element 14". You want to click there where it says "Victoria4_2_6_Eyelash". And go to the top and choose to create a new asset - Material, name it Eyelashes and put it in the DazToUnreal folder.
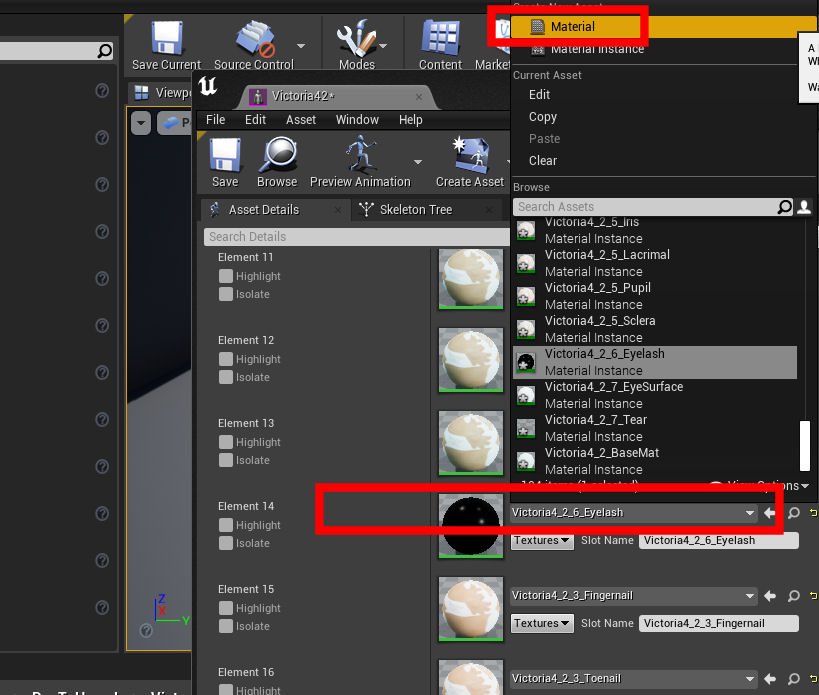
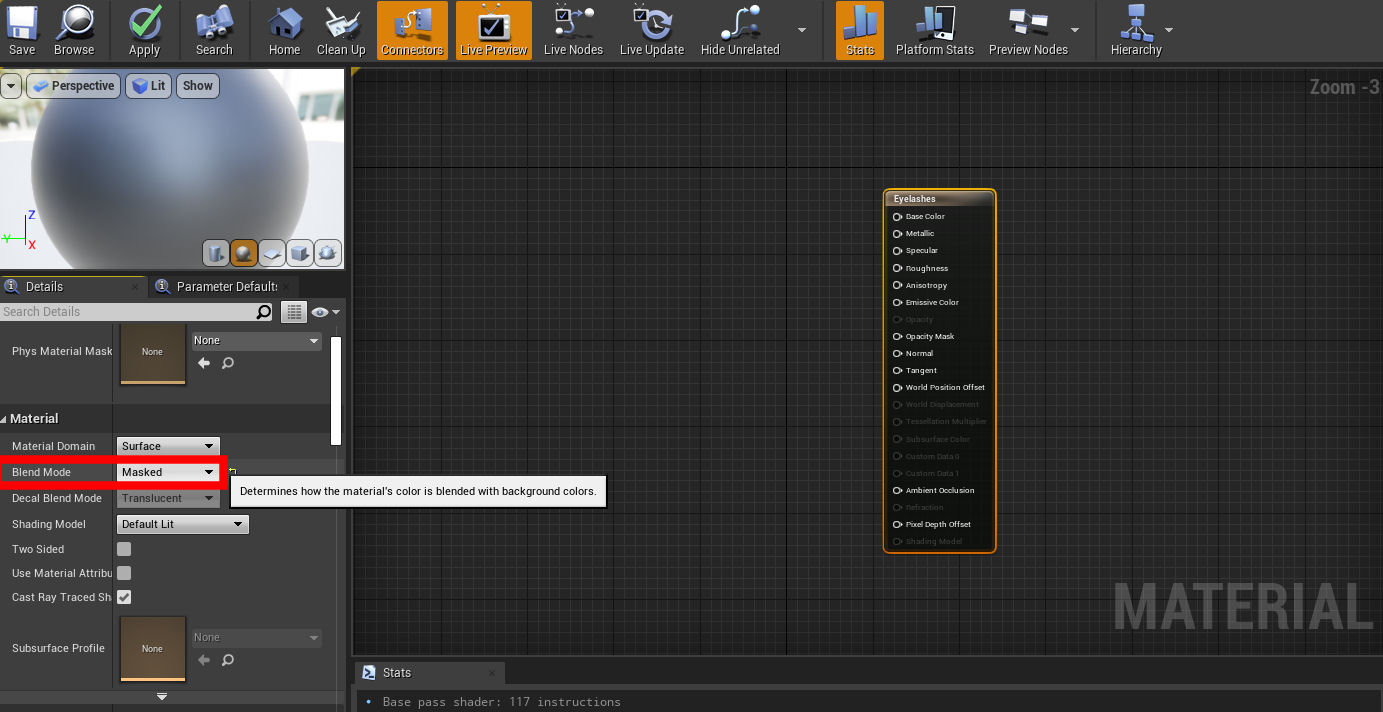
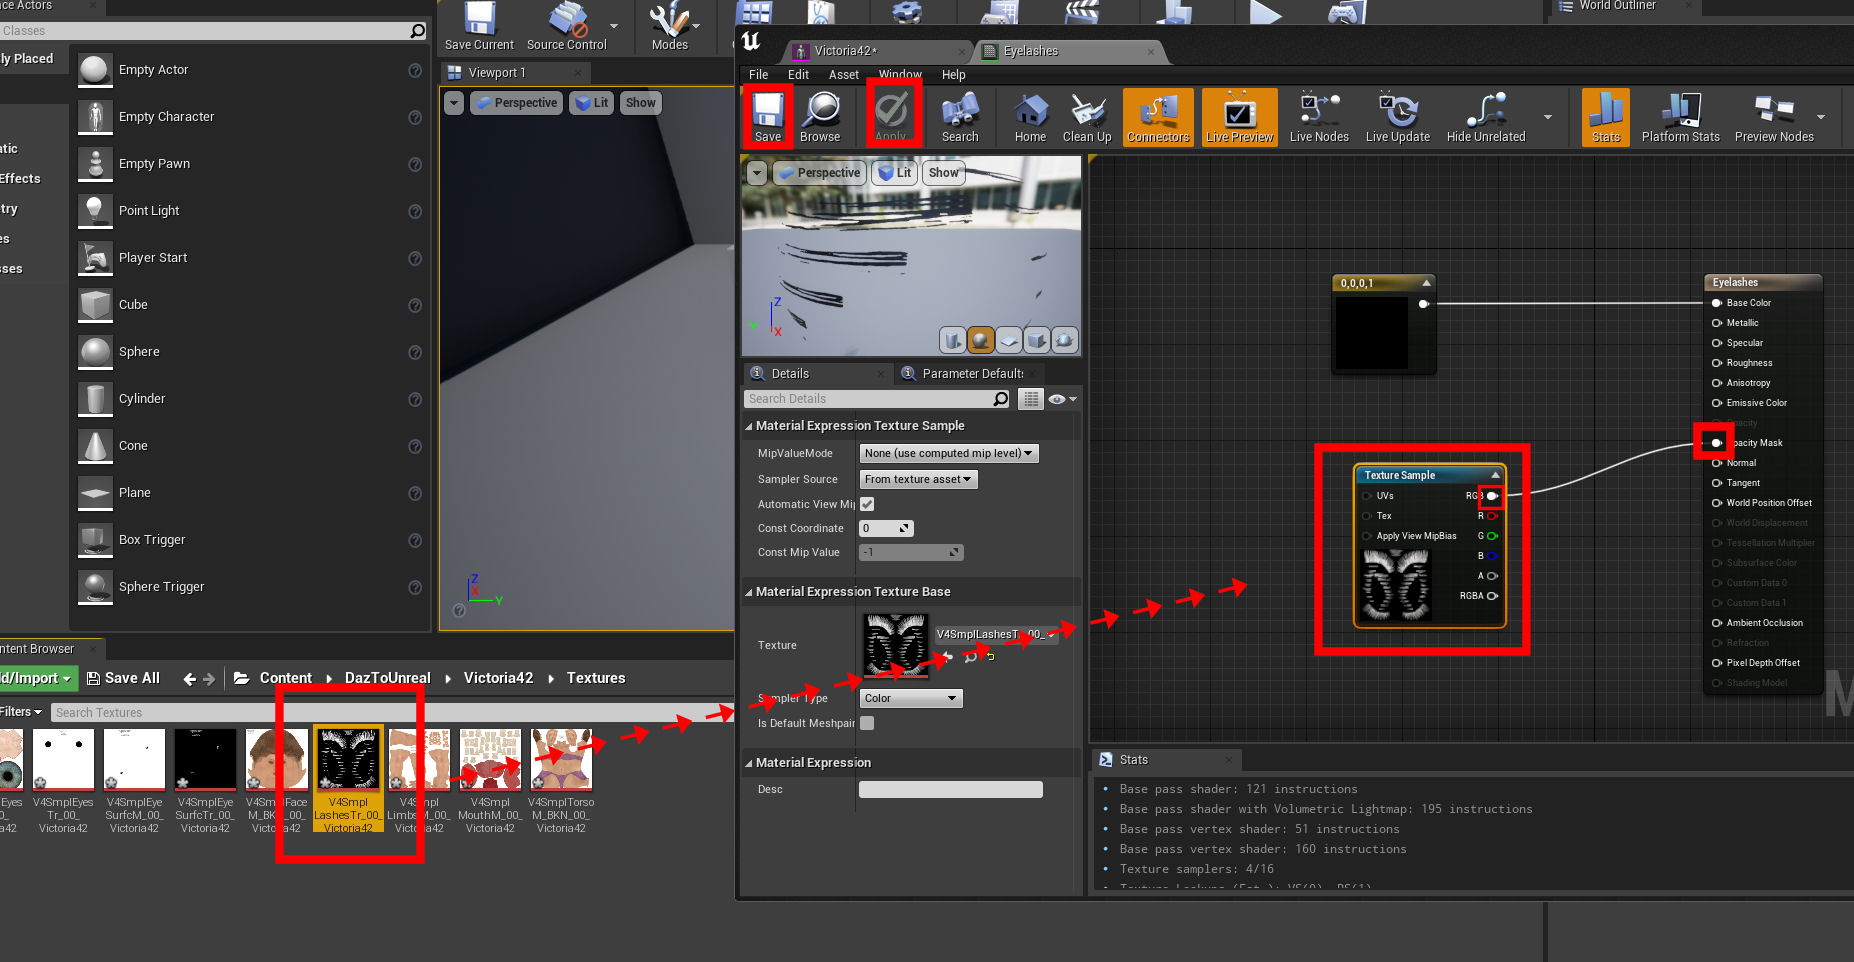
Now it brings you back to that same location, double click on that black orb again to bring up the eyelashes material you just made.You should see the main "eyelashes" node in an empty graph, if it is not selected then select it, and change the Blend Mode to "Masked".
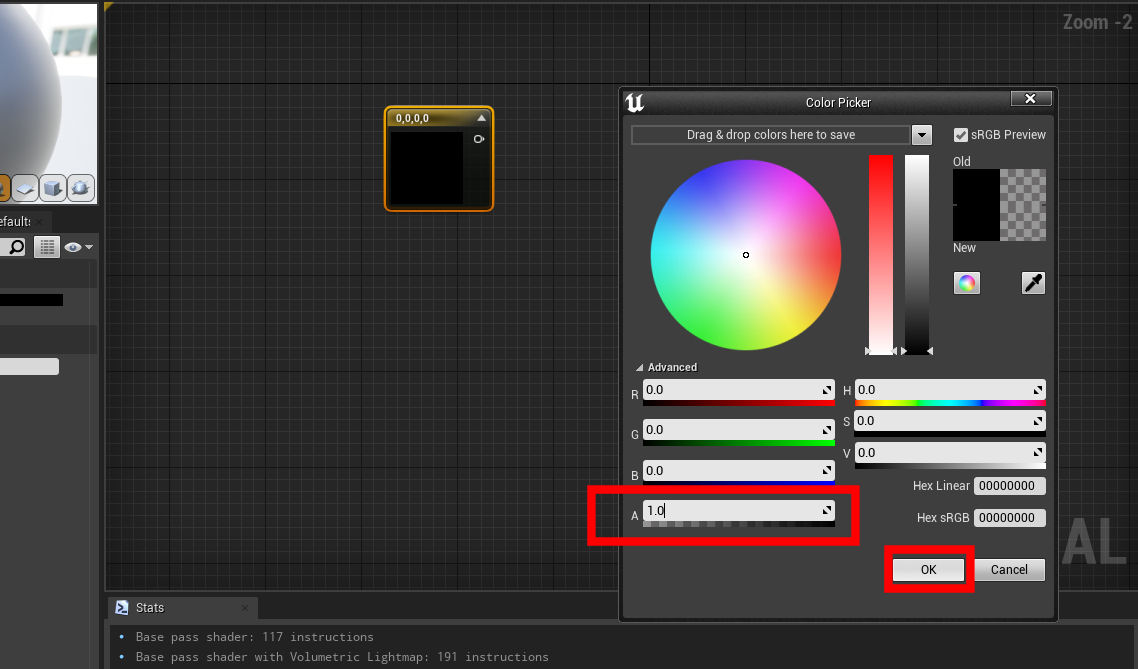
Now right click in any blank spot in the graph and search for "ConstantVector4D", open it up and change Alpha to 1.0 and hit ok.
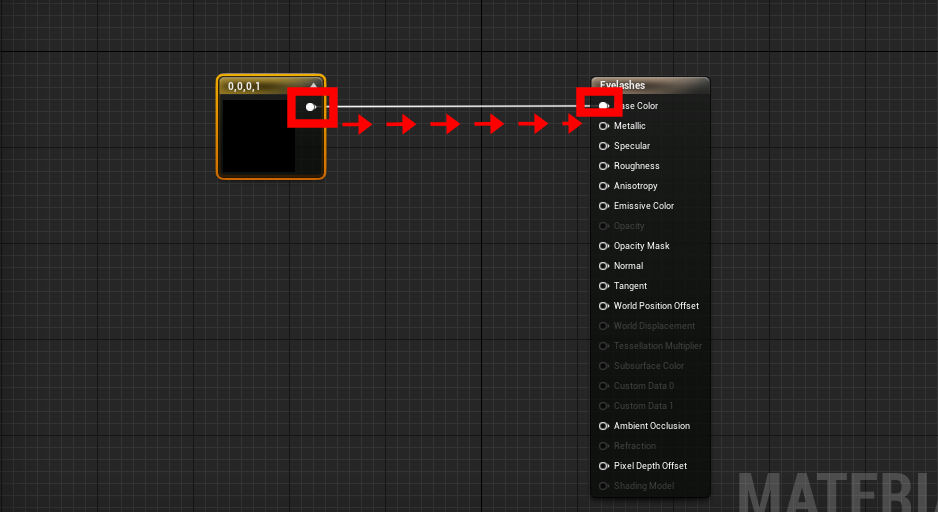
Next using the left mouse button click in the output of the Constant node and hold the button and drag over to the Base Color of the main node and release the mouse button to connect it. If you are successful you should see a wire connecting the two nodes.
Now navigate to the Victoria42 - Textures folder and look for the "V4SmplLashesTr_00_Victoria42" texture. Drag and drop it into the graph of the material. Connect its RGB output to the Opacity Mask input of the main node. Hit Apply and Save up top. Close that window.
Now go back into the mesh and look at her eyelashes, they should be fixed now.
Now its time to do some adjustments on V4's skeleton.
----------------------------------------------------------------------------------------------------------------------------------------------------------------------------------------------------------------------------
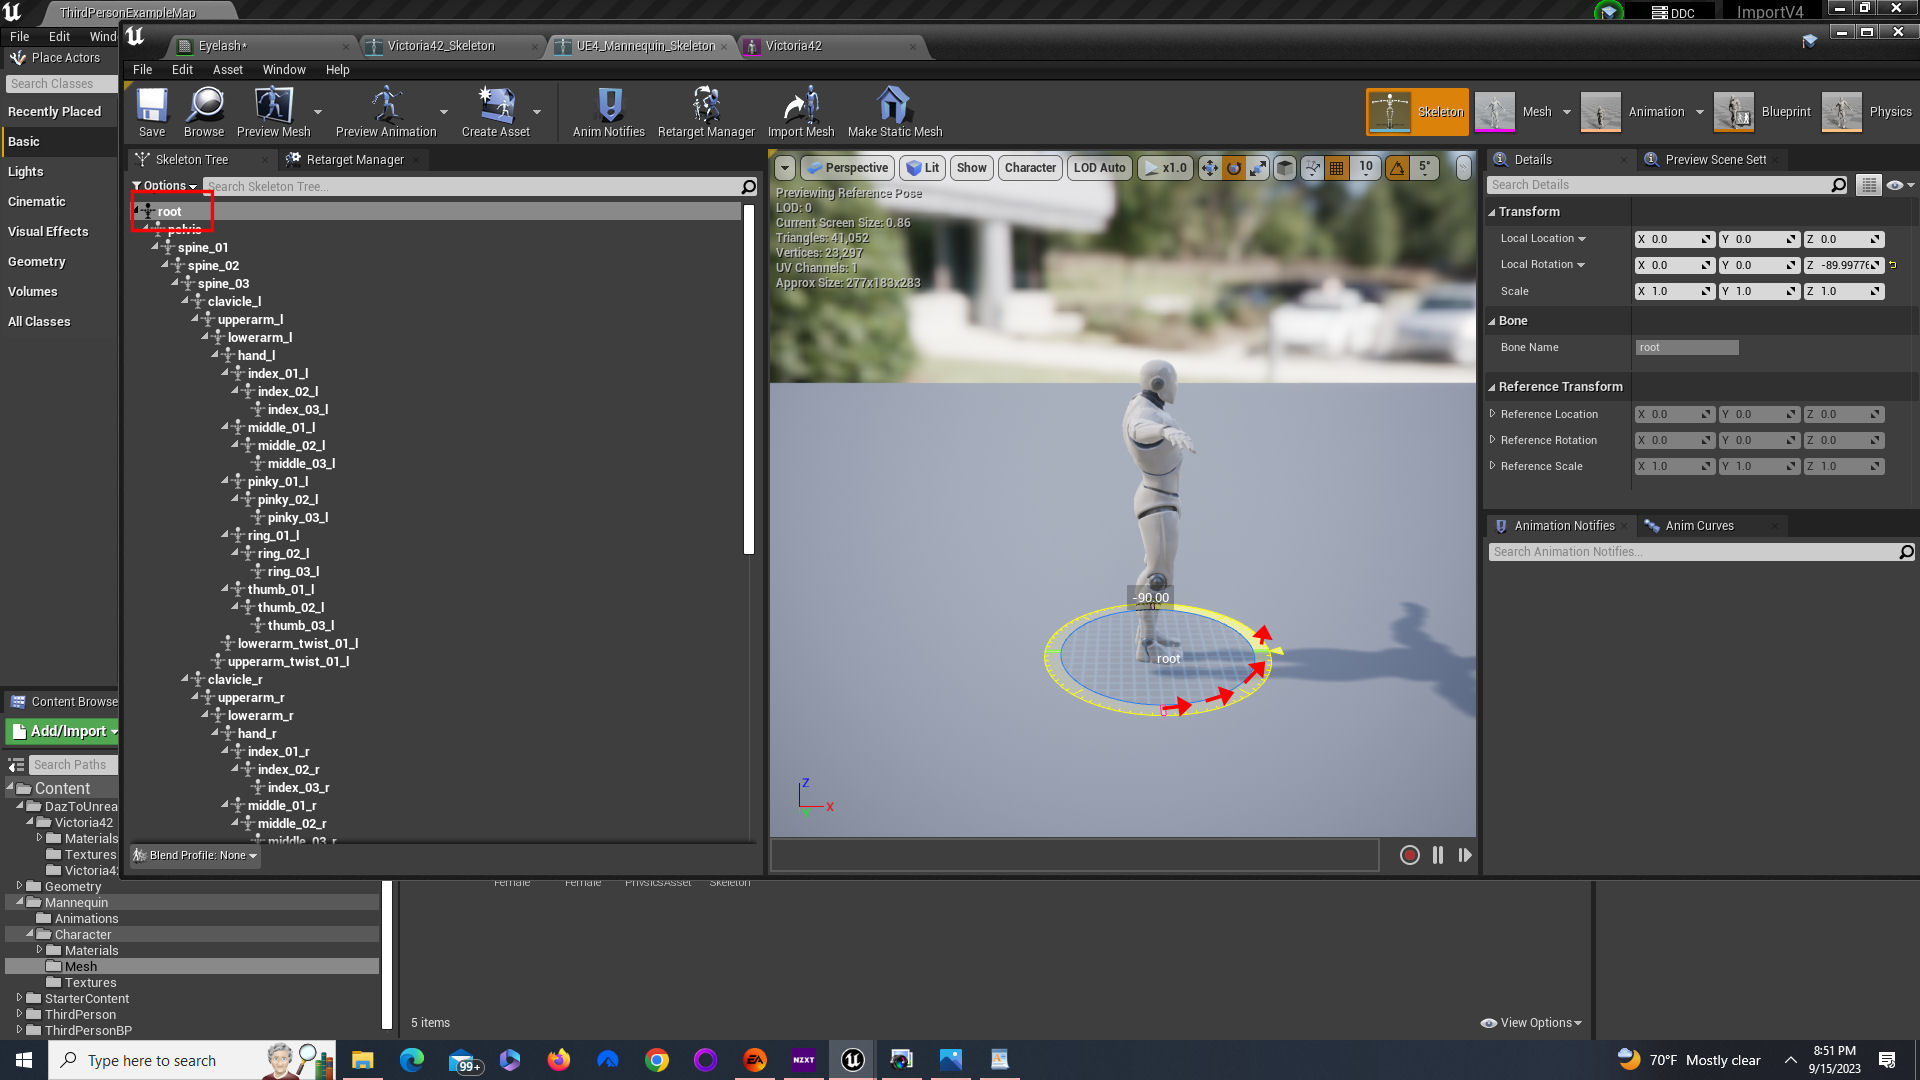
(Part 2)- Victoria4 - Select the Victoria42 skeleton and open it.
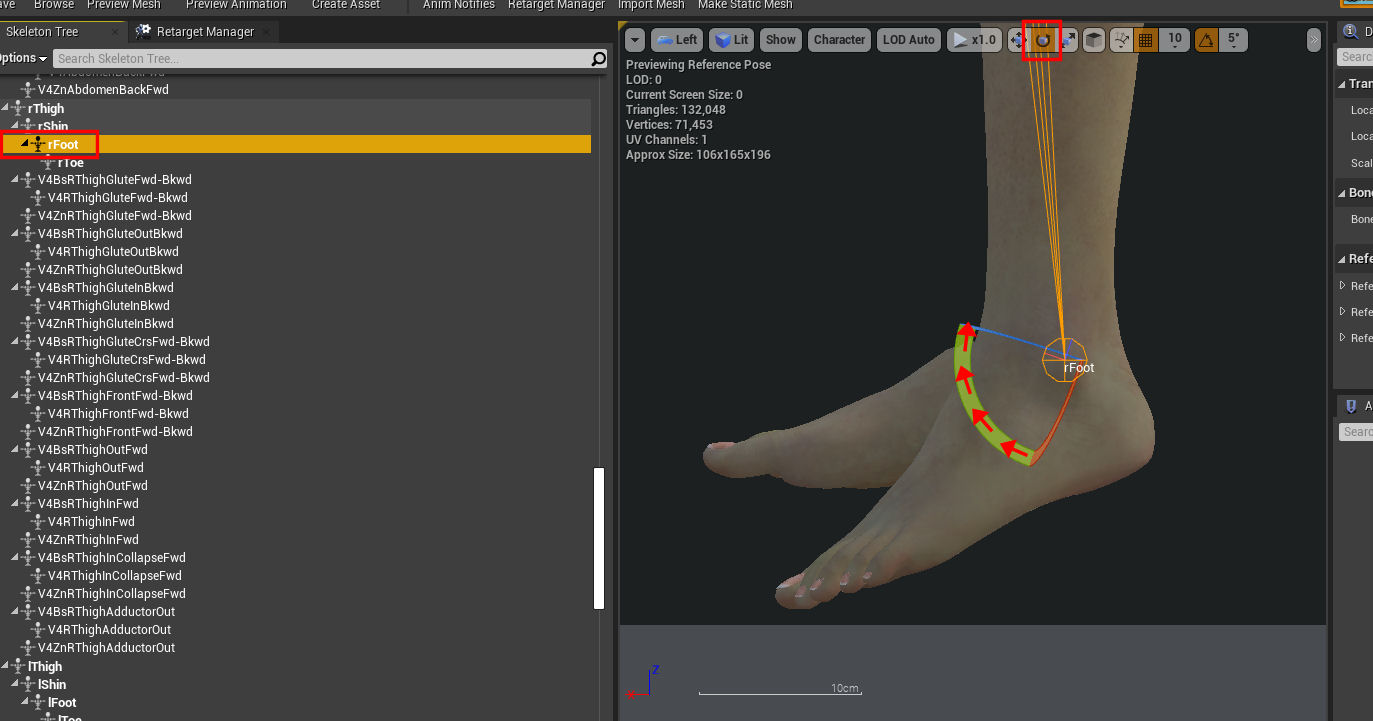
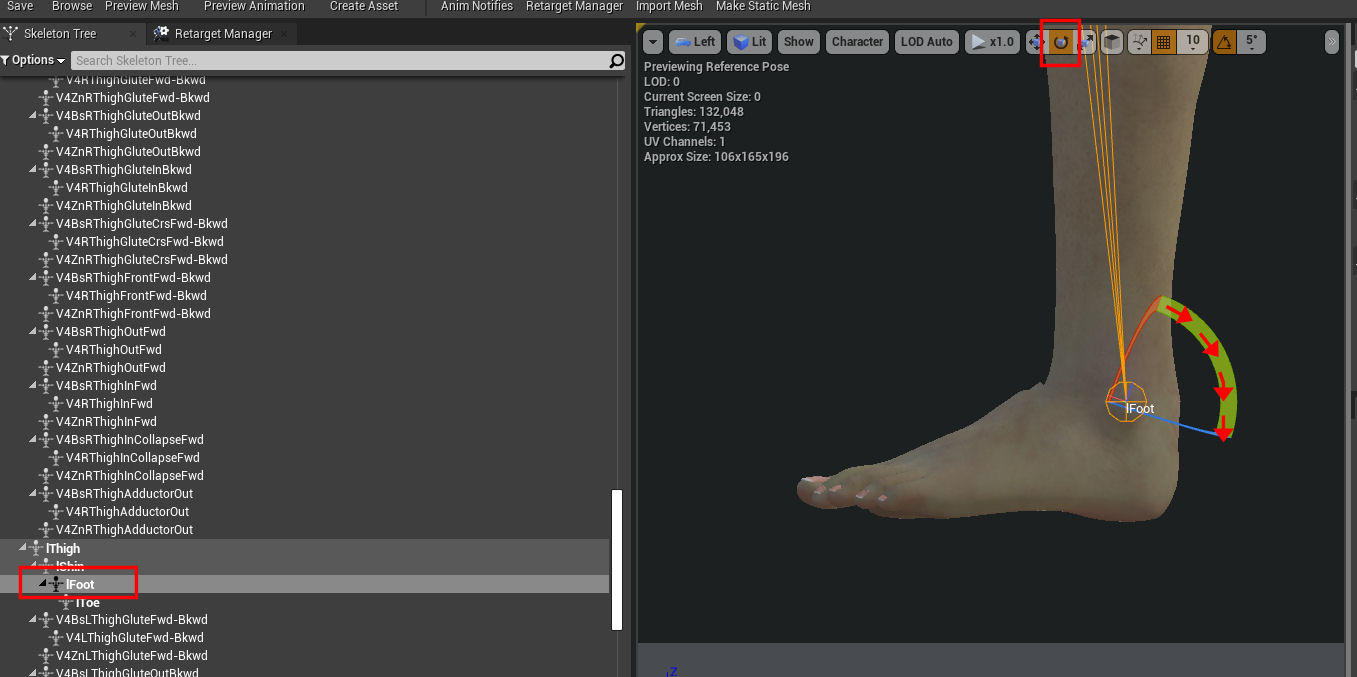
Make sure the angle snap is on and is set to 5 degrees, select the left view, it will probably default to wireframe view, which can be turned back to "Lit" mode like the perspective view. select the Skeleton Tree tab.
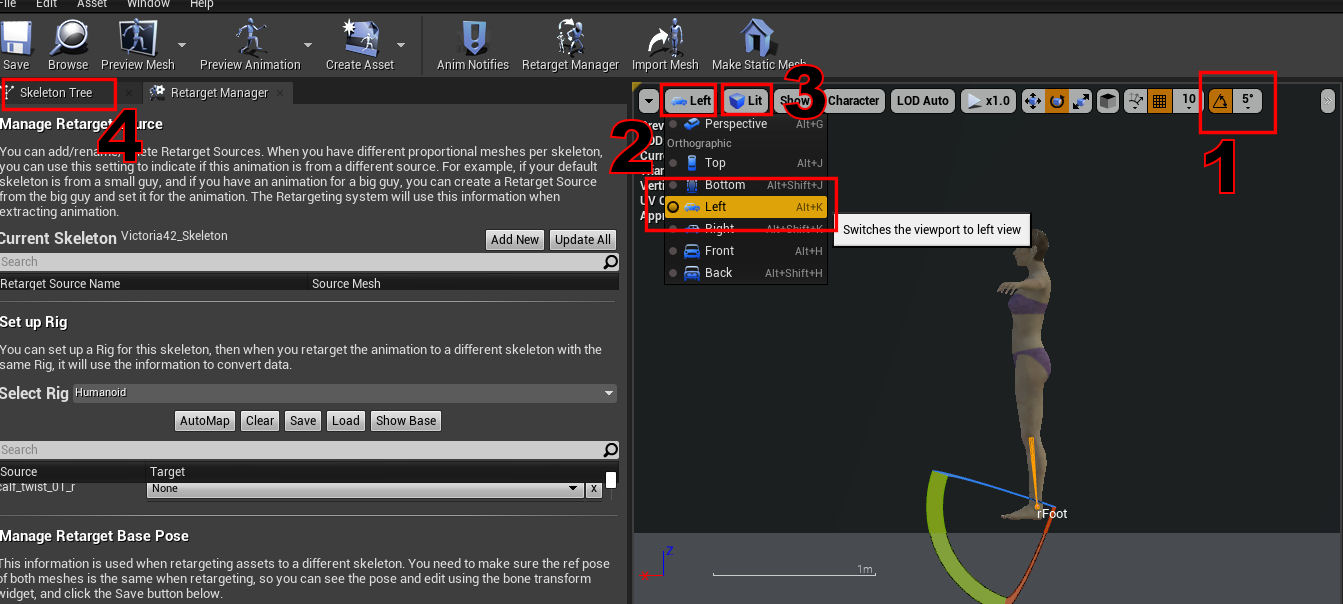
Here we will be selecting the "rFoot" and then "lFoot" bones and using the green dial (Y Axis) to rotate the bones 25 degrees and make the feet flat VS the ground to match the UE4_Mannequin_Skeleton (also make sure you are in rotate mode up top to get the correct gizmo to appear on screen). In Retargeting in UE4, you want to get the two character's as close as possible before you retarget the animations. To avoid oddities.
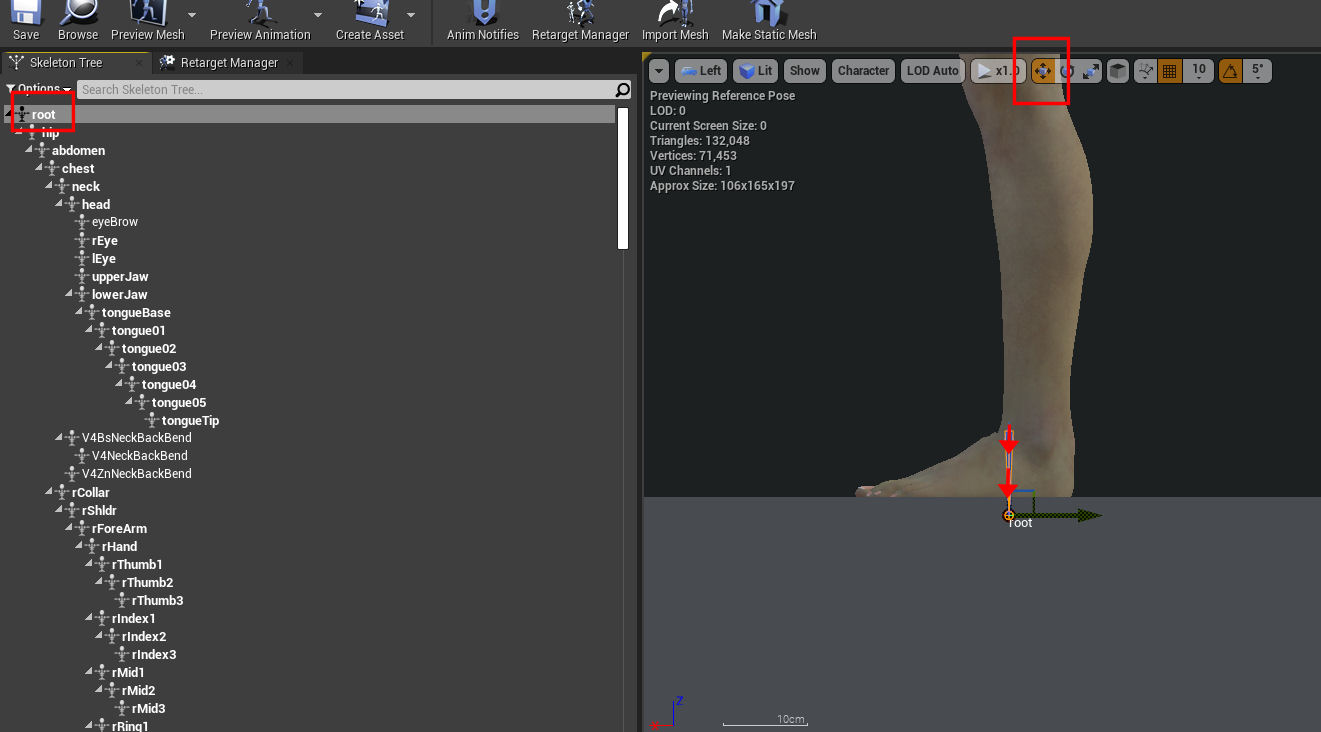
Now select Victoria4's root. Up high, press the "Select and translate" button (W). Grab the blue (Z Axis) arrow with your left mouse button held and drag down. For me the character made one snap quantized jump and the character was flat on the floor.
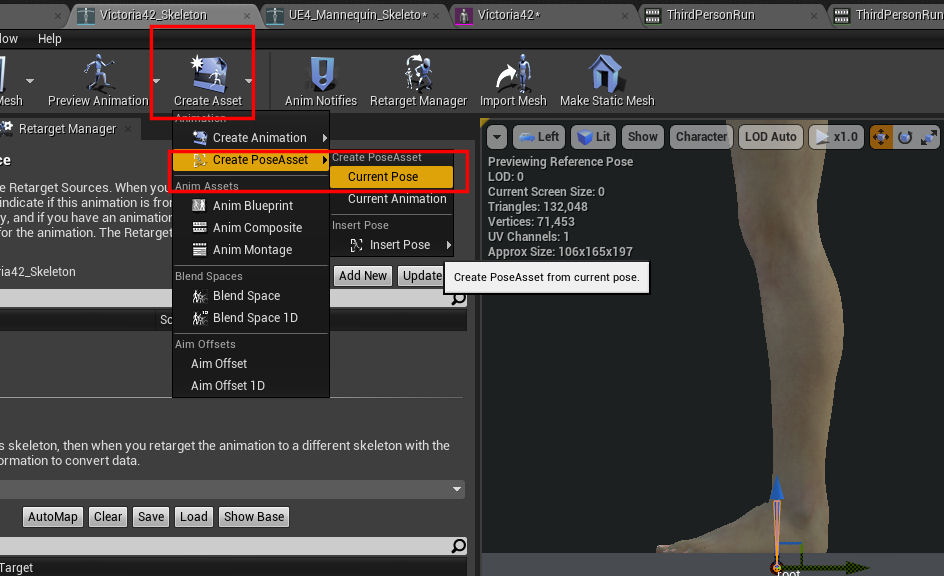
Now you are going to save a "Pose Asset", you just moved the character's feet, and you moved the whole character, this Pose Asset can be quickly accessed later to save you time from doing this step again. Press the "Create Asset" button, then choose Creater PoseAsset, then choose CurrentPose. Name it whatever you want and try to to put it somewhere that you can find.
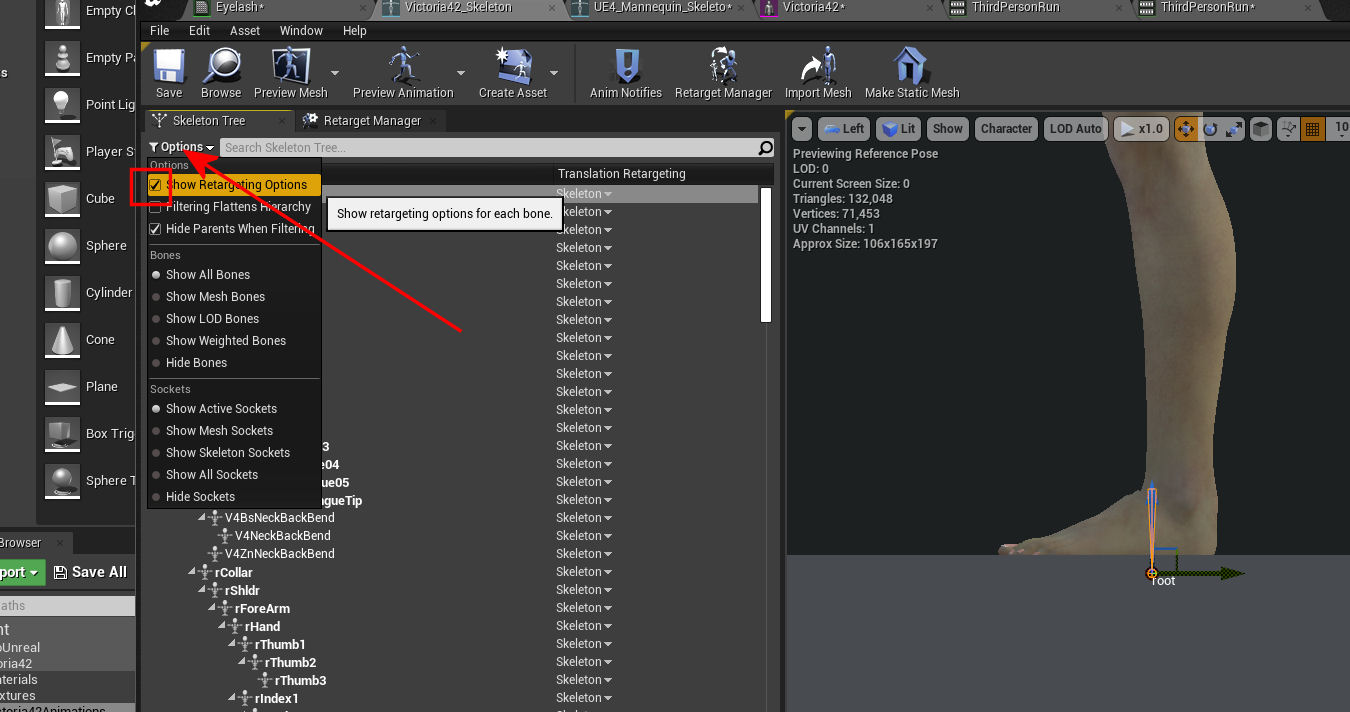
Now go to the Options of the Skeleton Tree and tick "Show Retargetting Options".
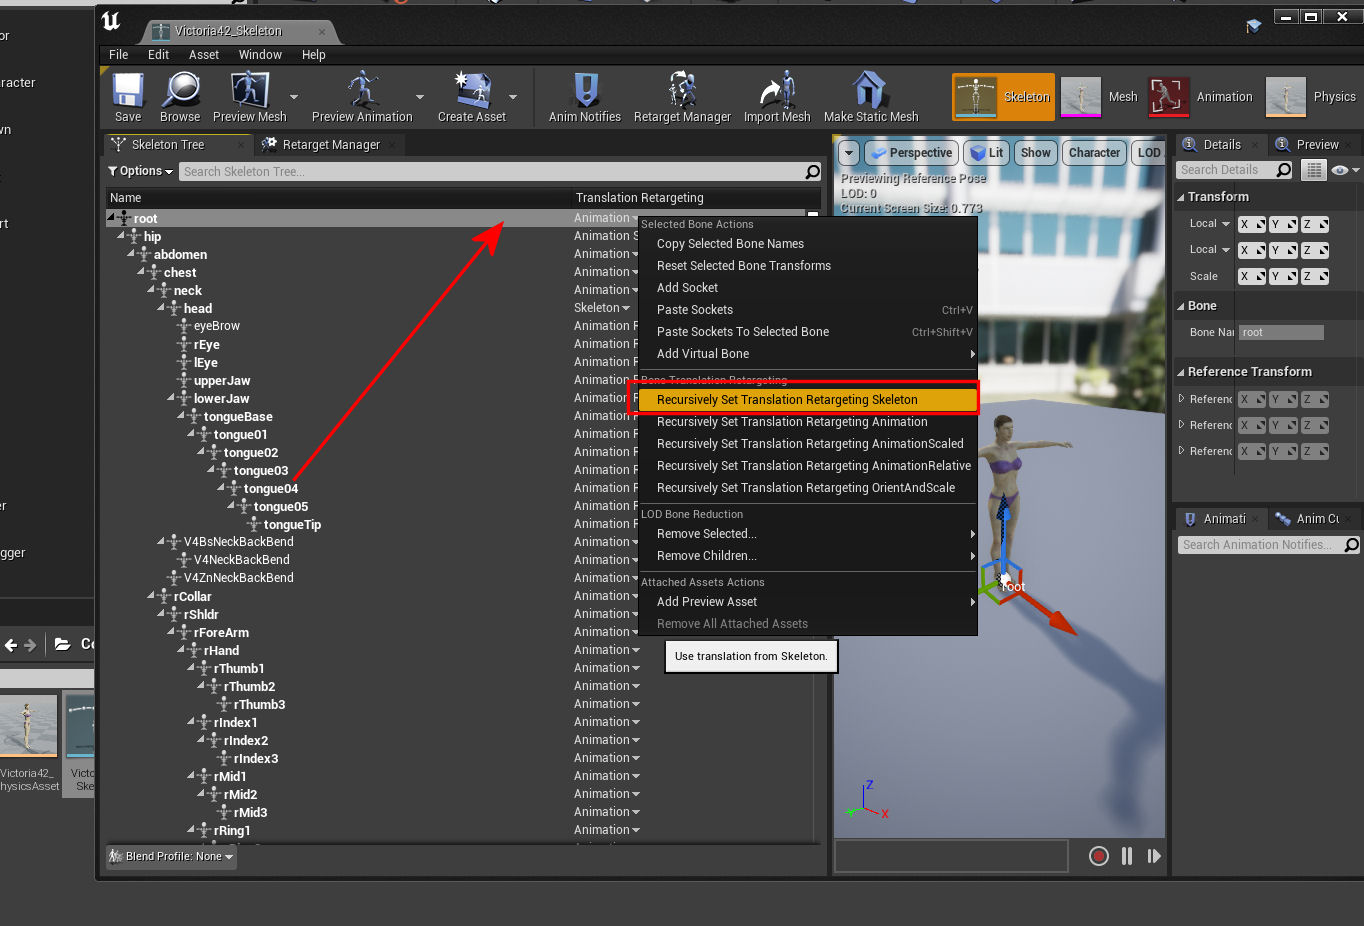
Now right click at the very top of the list in and empty spot out from the root and choose "Recursively Set Translation Retargeting Skeleton". Imagine having to say that three times fast. This should set all the bones to this option. IF that step is not done, when the animations are retargeted Victoria will look like a mutant with long stringy and pointy fingers and things.
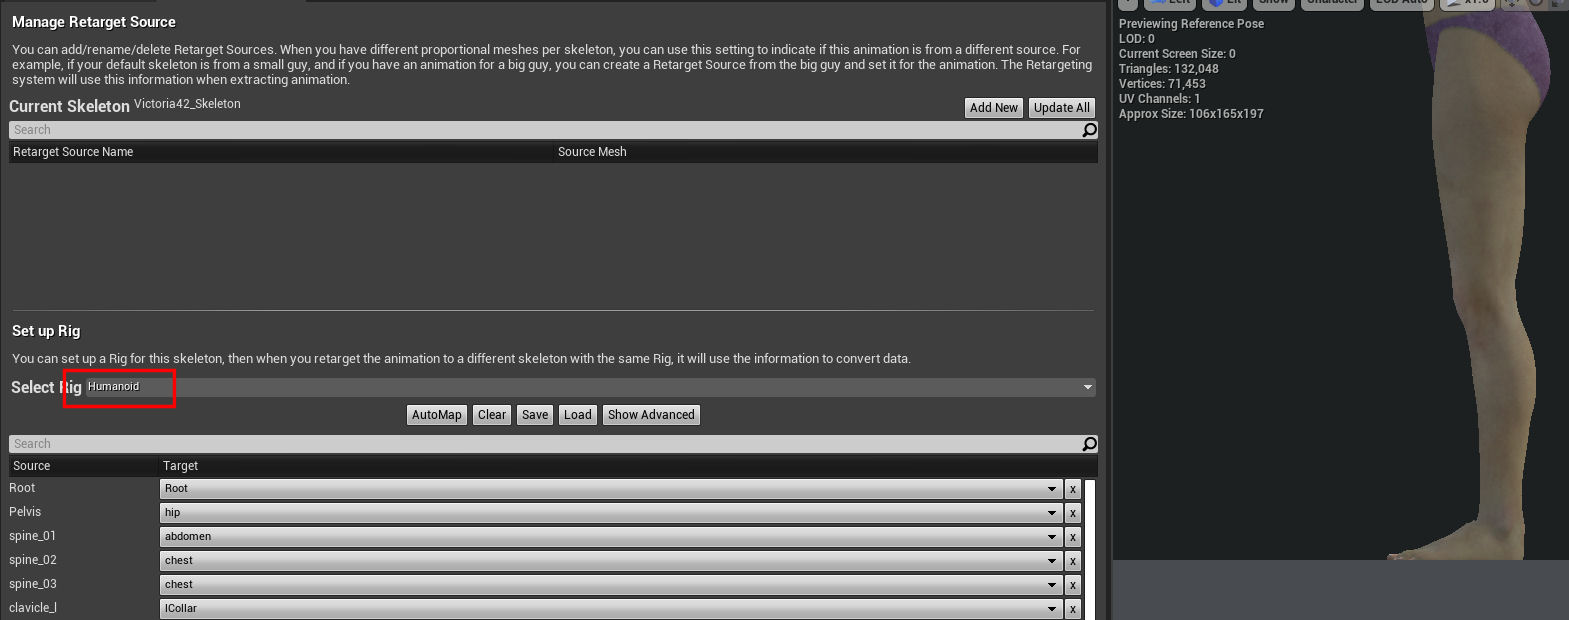
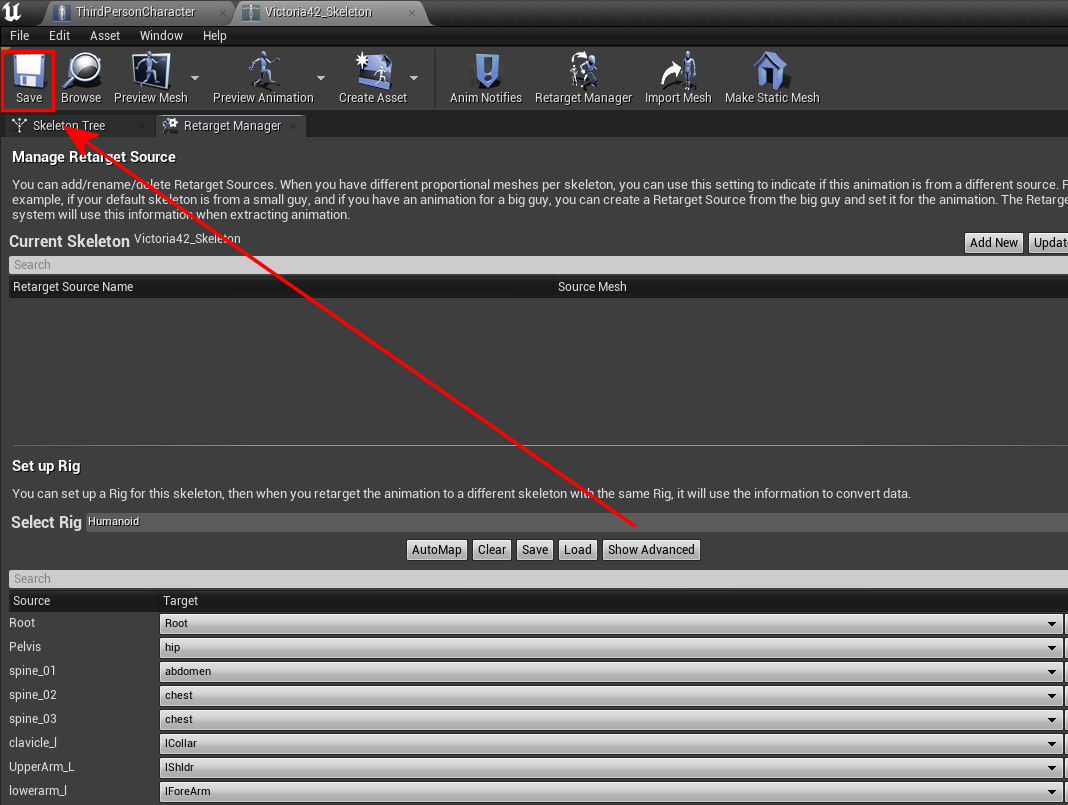
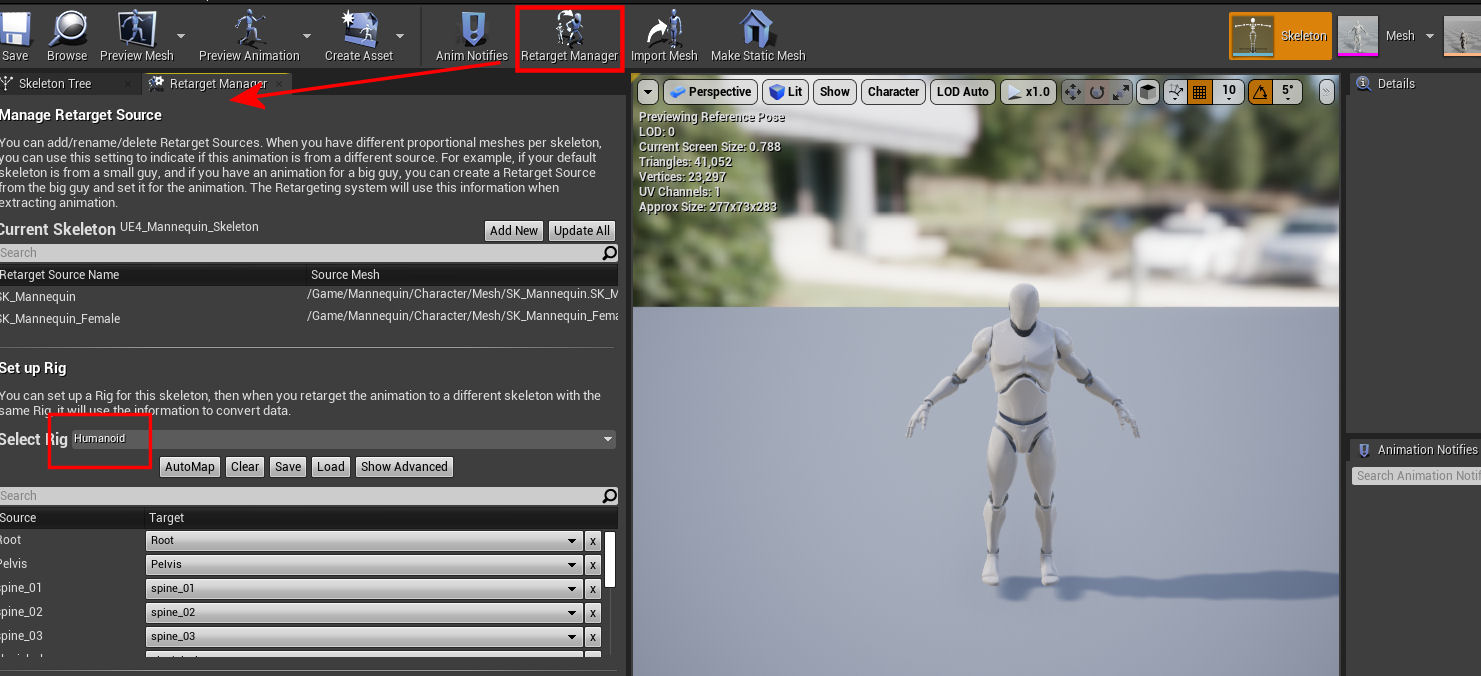
Go back to the retargetting manager tab. And in the Set up Rig section, choose "Humanoid".
This next part can be time consuming, and very tedious, just try to make sure and get it right the first time. Use the following settings for the normal and then advanced bone mapping. You might need to save and stop if you have to.
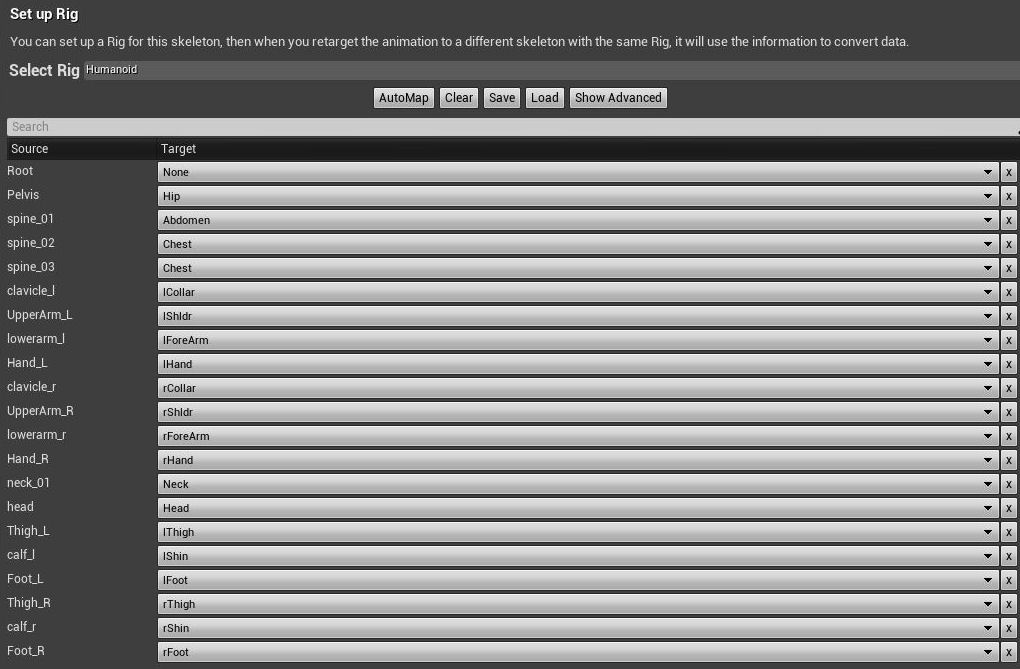
In the advanced bone mapping, when you see "None", to get none you can simply click on the small x icon to the far right of each bone if an when you need to.
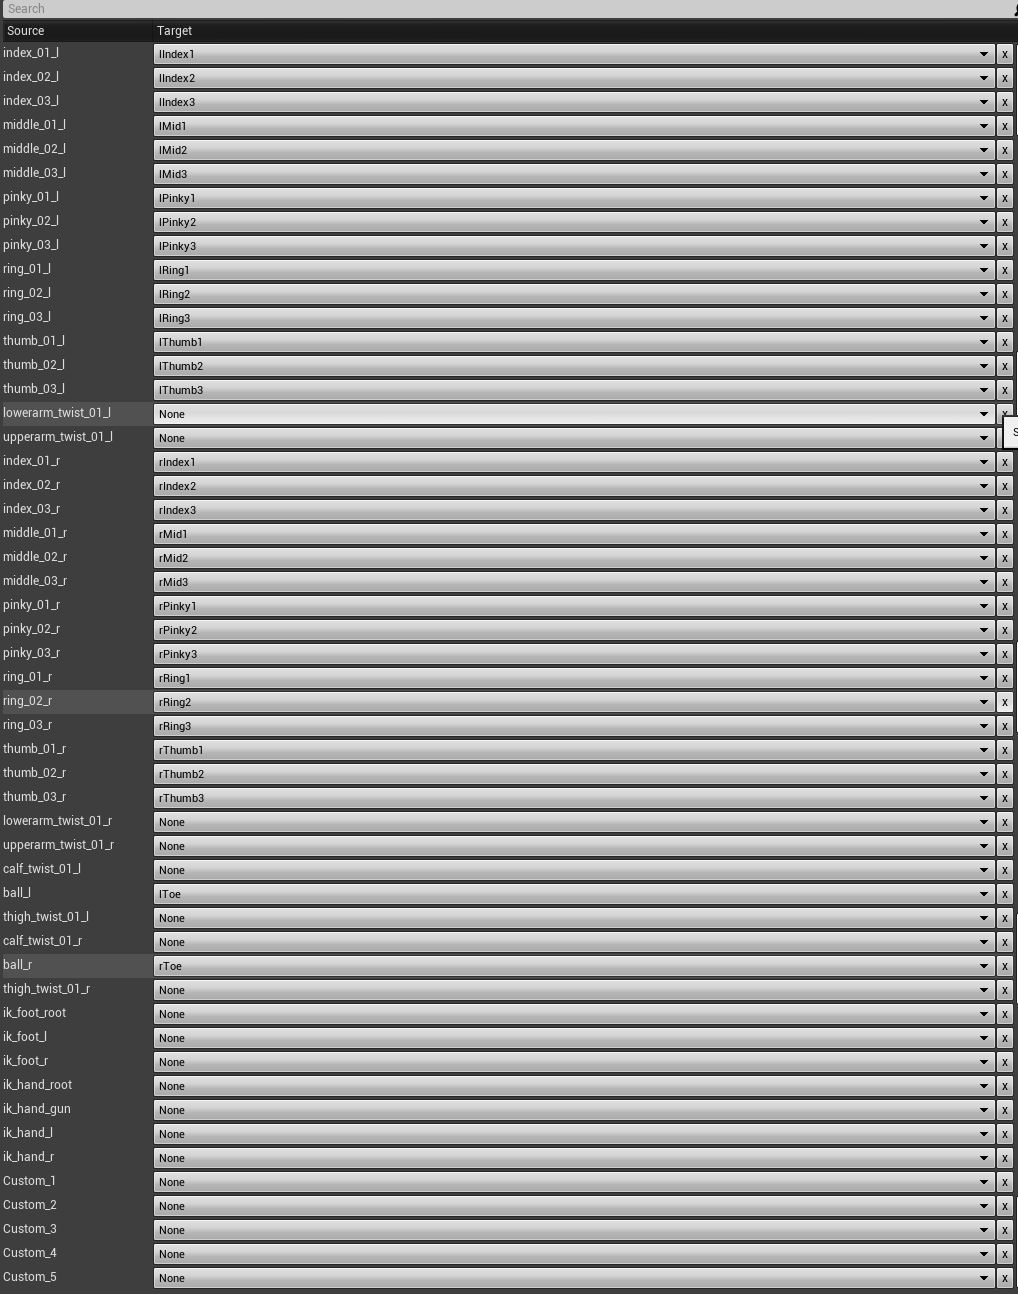
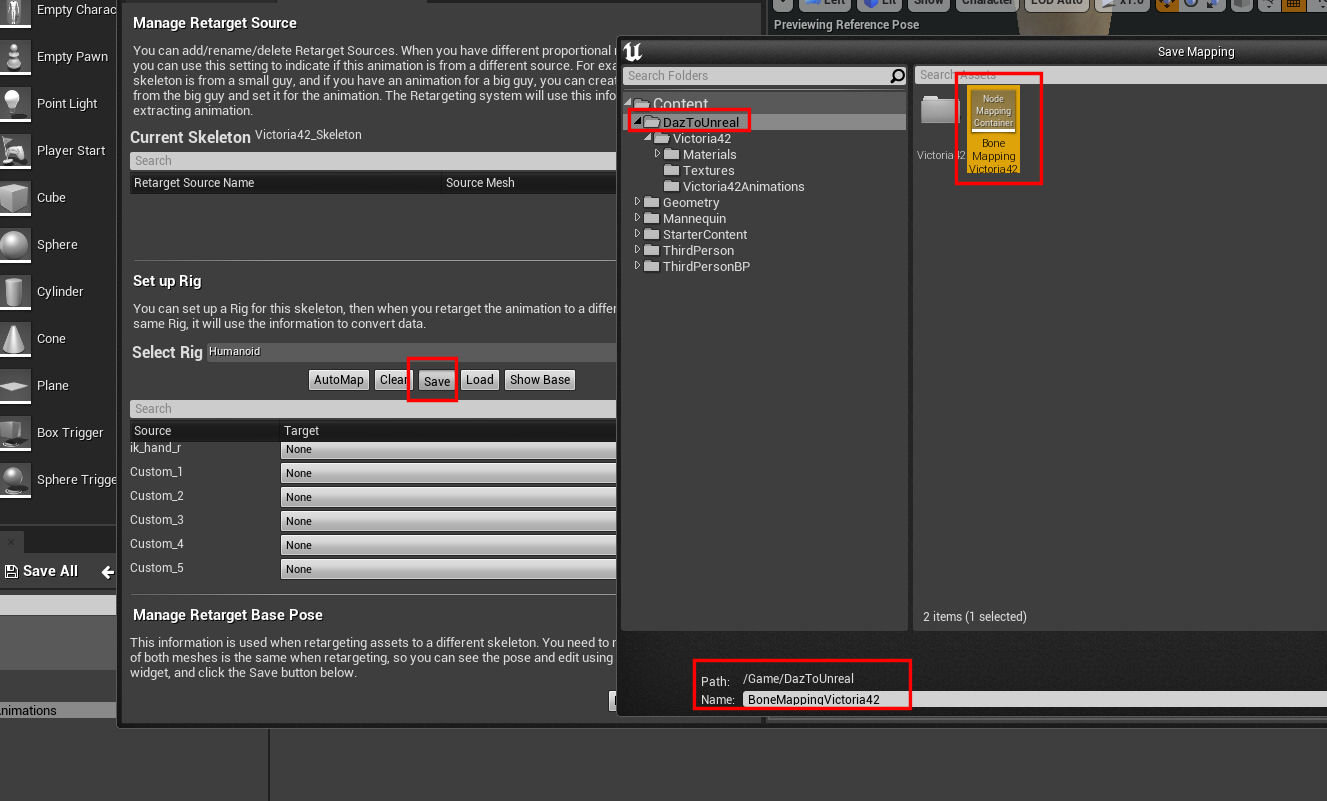
I would strongly recommend for you to save that bone mapping to somewhere that you can find it again, else you might have to do all this again next time you reopen the program. To do that simply press the save button right there above the bone mapping, and put it somewhere in the project that you can find.
And now at the very bottom of the Retarget Manager tab press "Modify Pose" and choose "Use Current Pose".
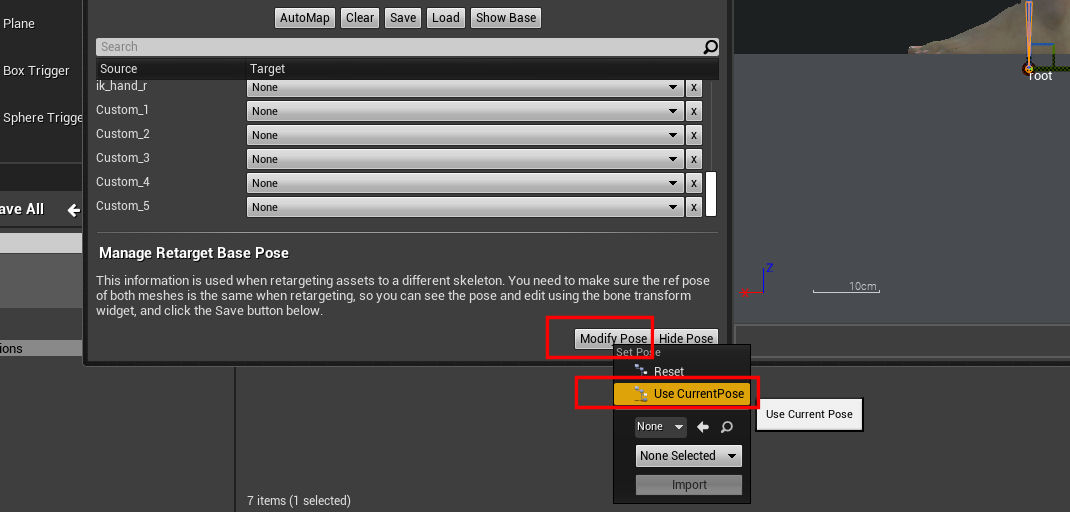
That needs to be done everytime that any changes happen here before you retarget. And finally, hit save up top, if all goes well, you should be good for the Victoria 4 Skeleton.
Now it is time to do some adjustments to the UE4_Mannequin_Skeleton.
----------------------------------------------------------------------------------------------------------------------------------------------------------------------------------------------------------------------------
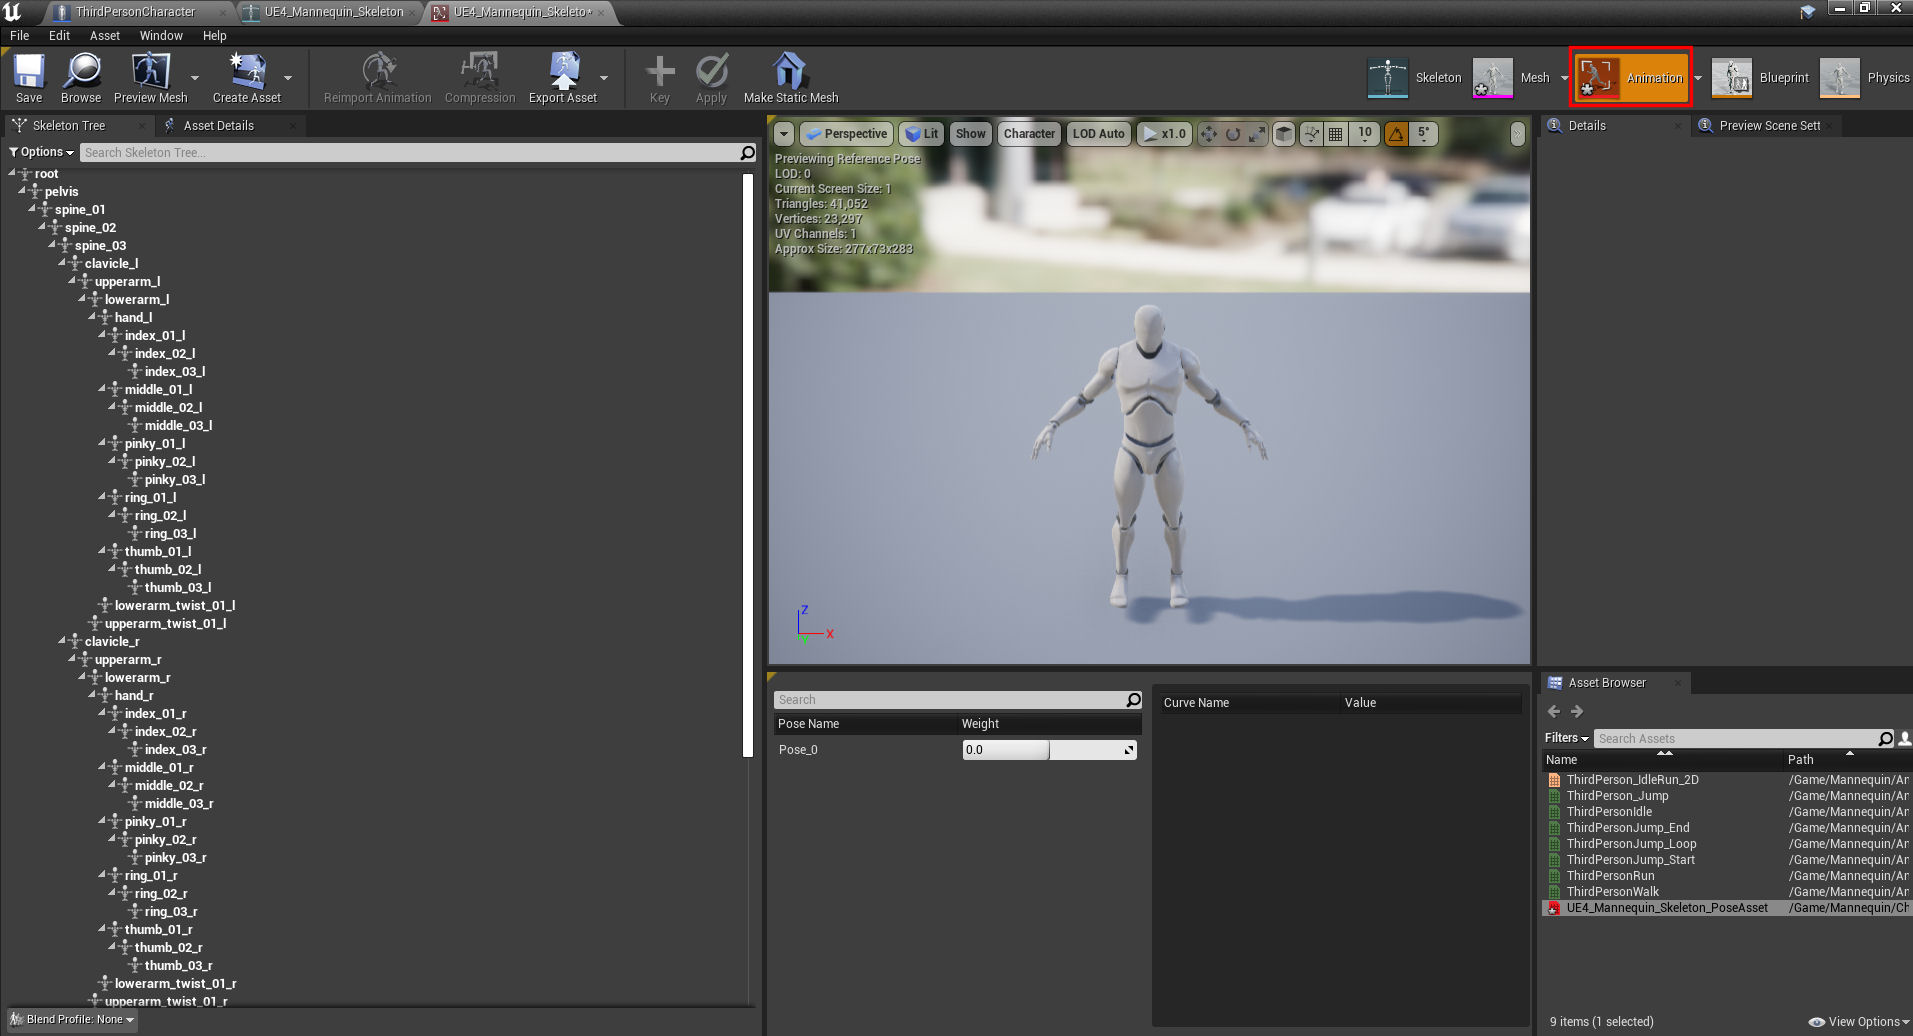
(Part 3) - UE4Mannequin - Select the UE4_Mannequin_Skeleton and open it.
Choose "Retarget Manager", or press on its tab and look in Set up Rig and choose "Humanoid".
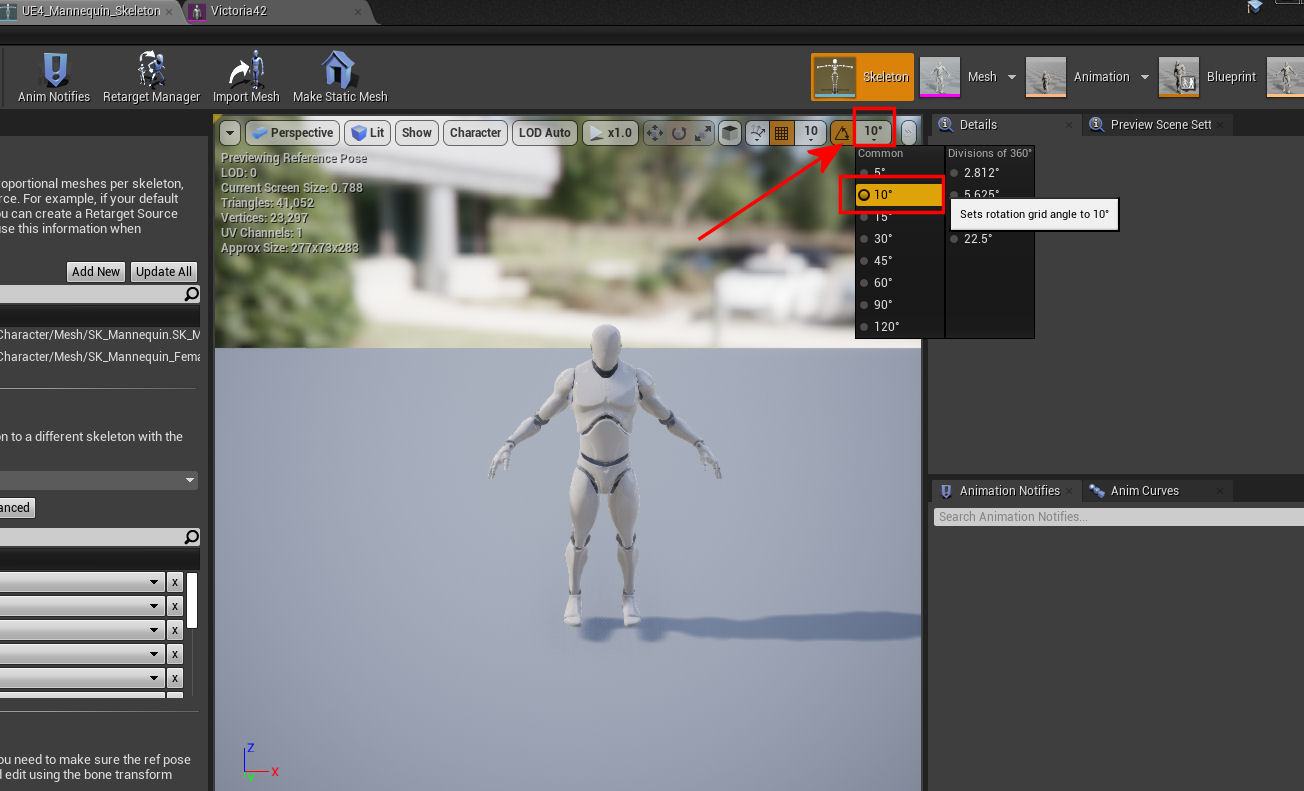
Make sure angle snap is turned on and set to 10 degrees.
Press the Skeletron Tree tab and then the Select and rotate objects (E) button for bone rotation mode (and that has to be chosen after you select a bone btw).
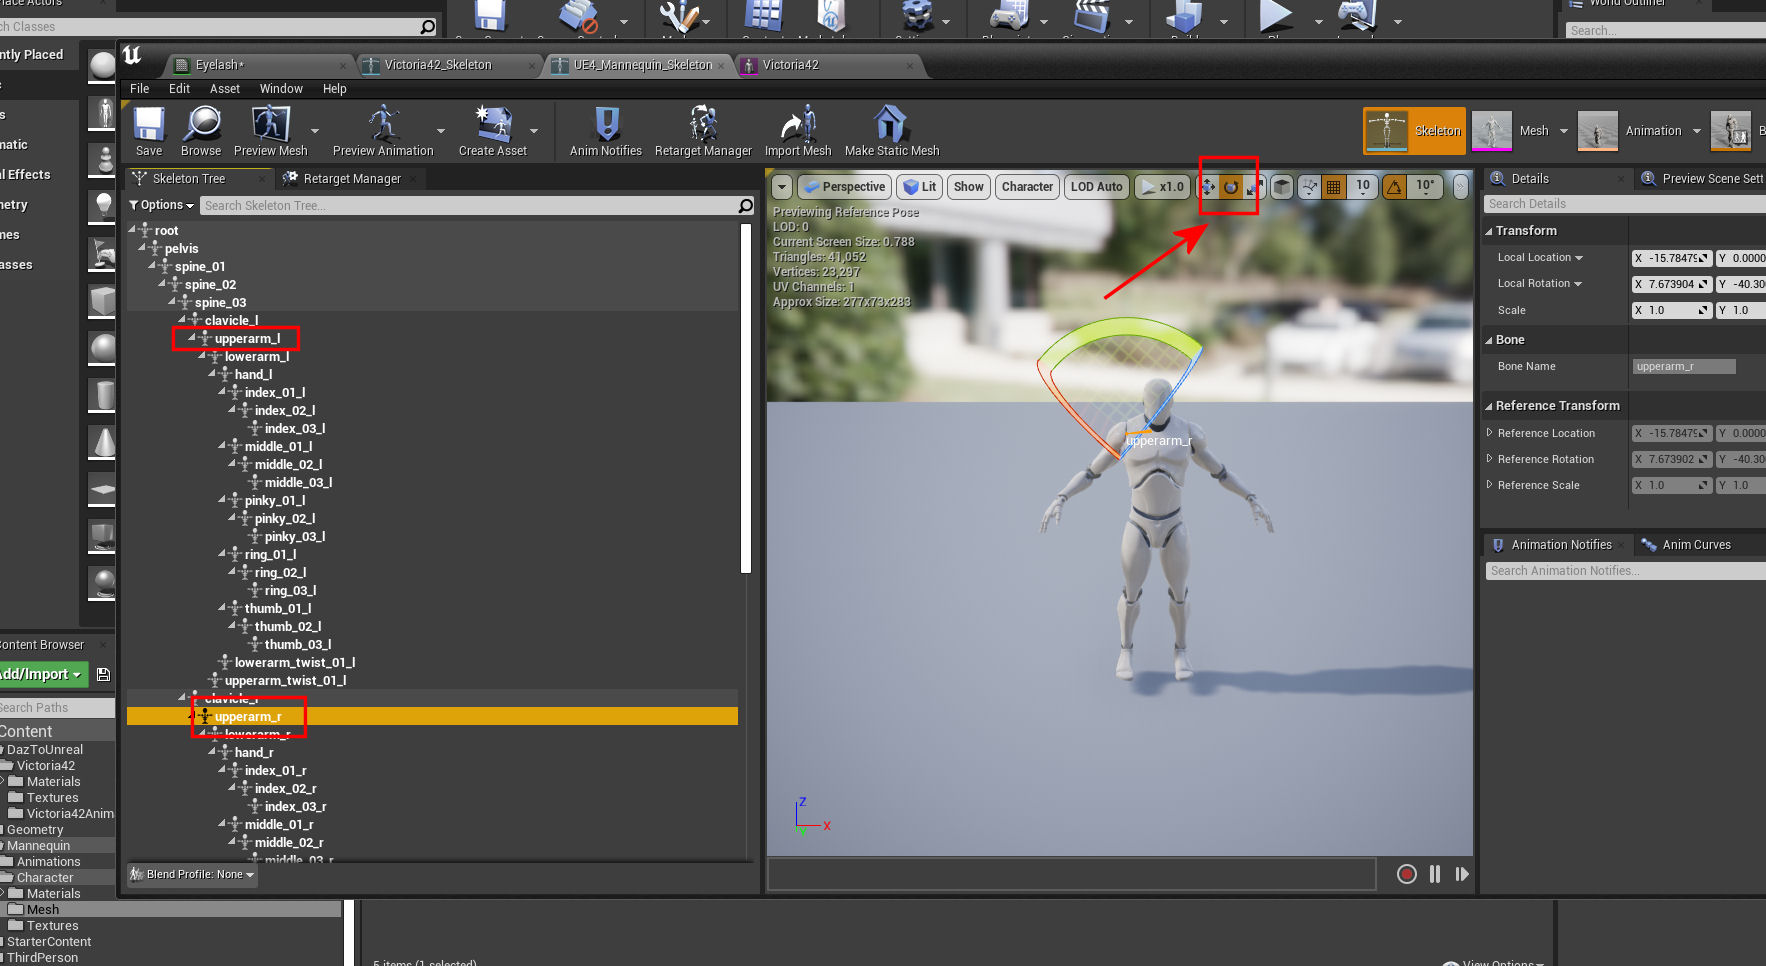
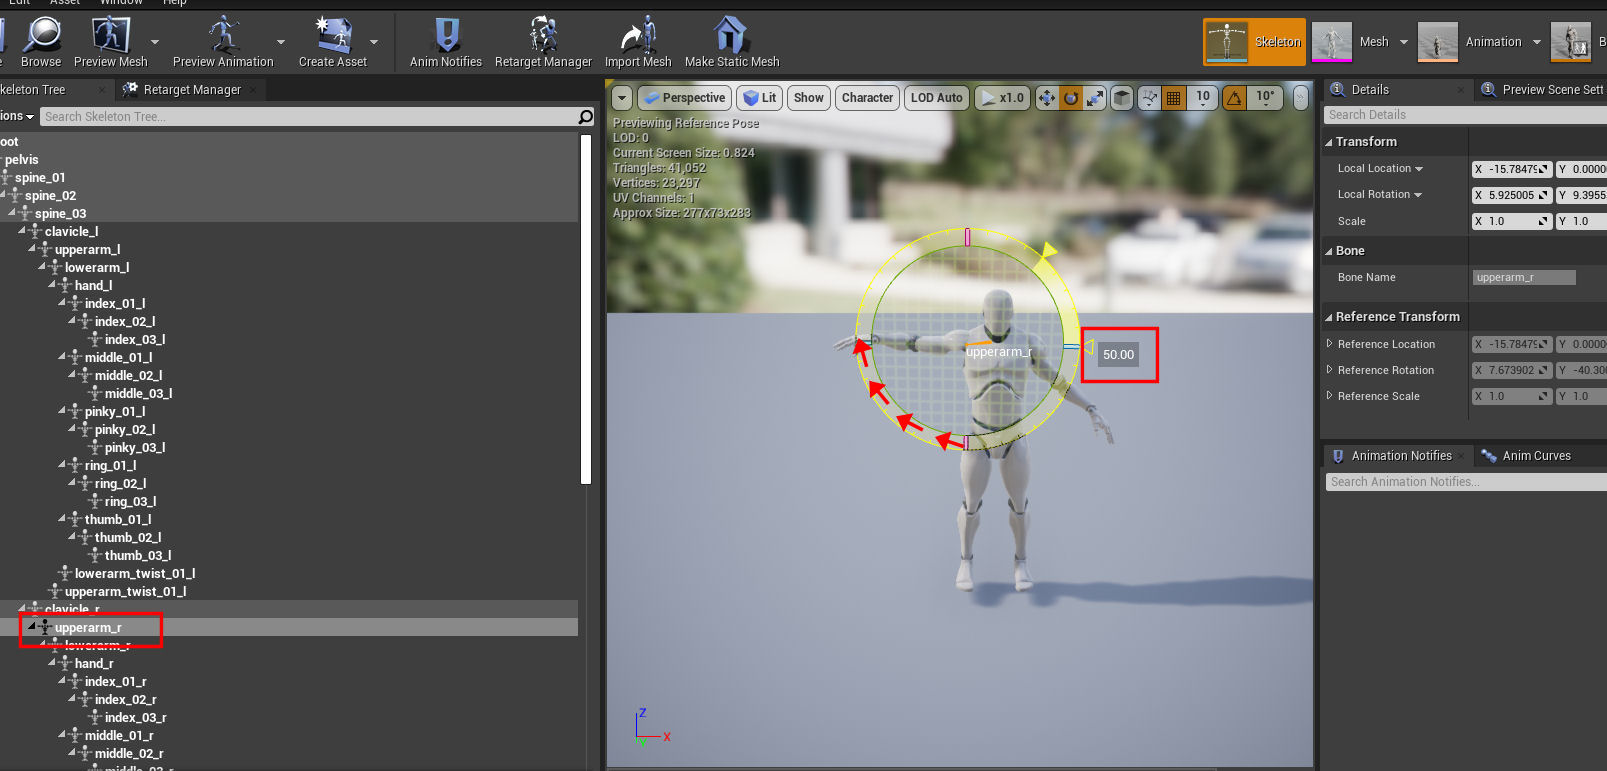
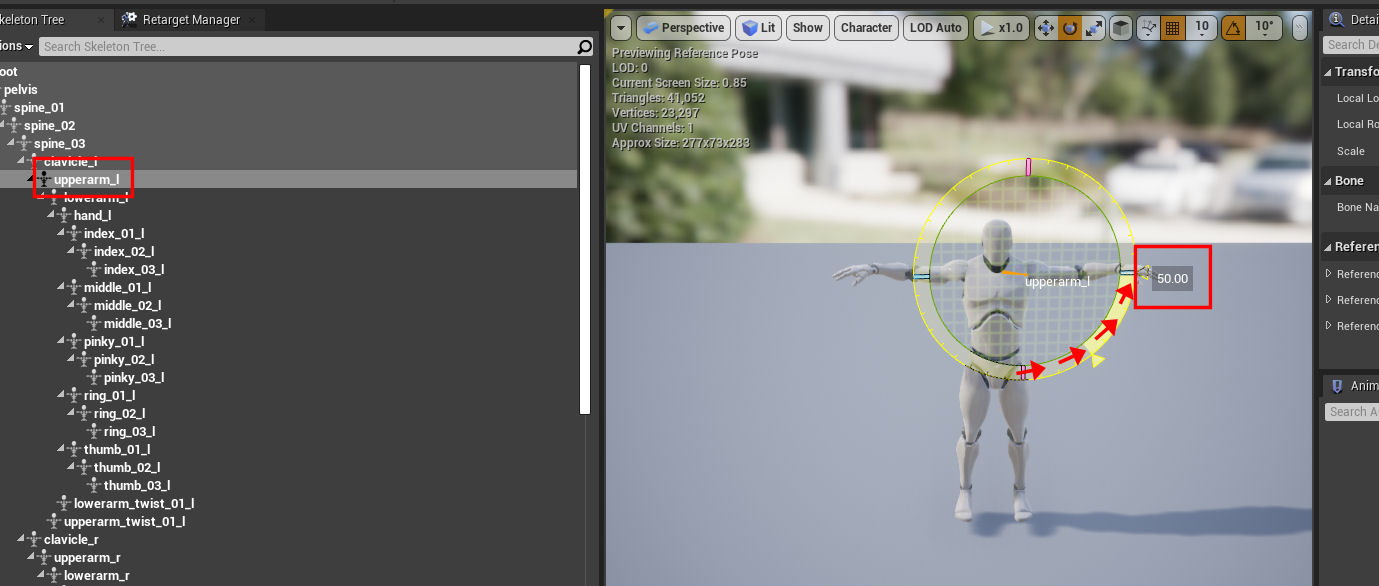
We will be selecting the "upperarm_r" and then the "upperarm_l" bones and rotating these bones grabbing the green handle (Y Axis) to essentially move them 50 degrees left or right to essentially turn the A pose into a T pose.
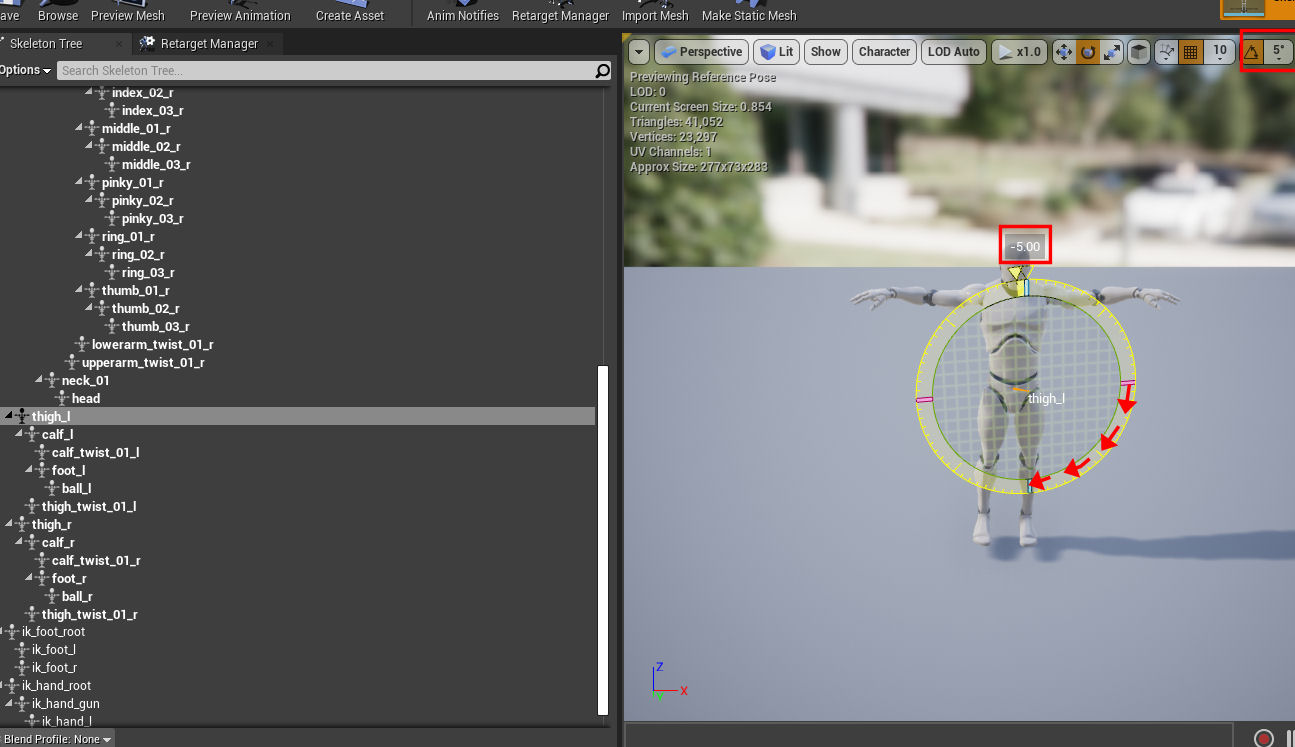
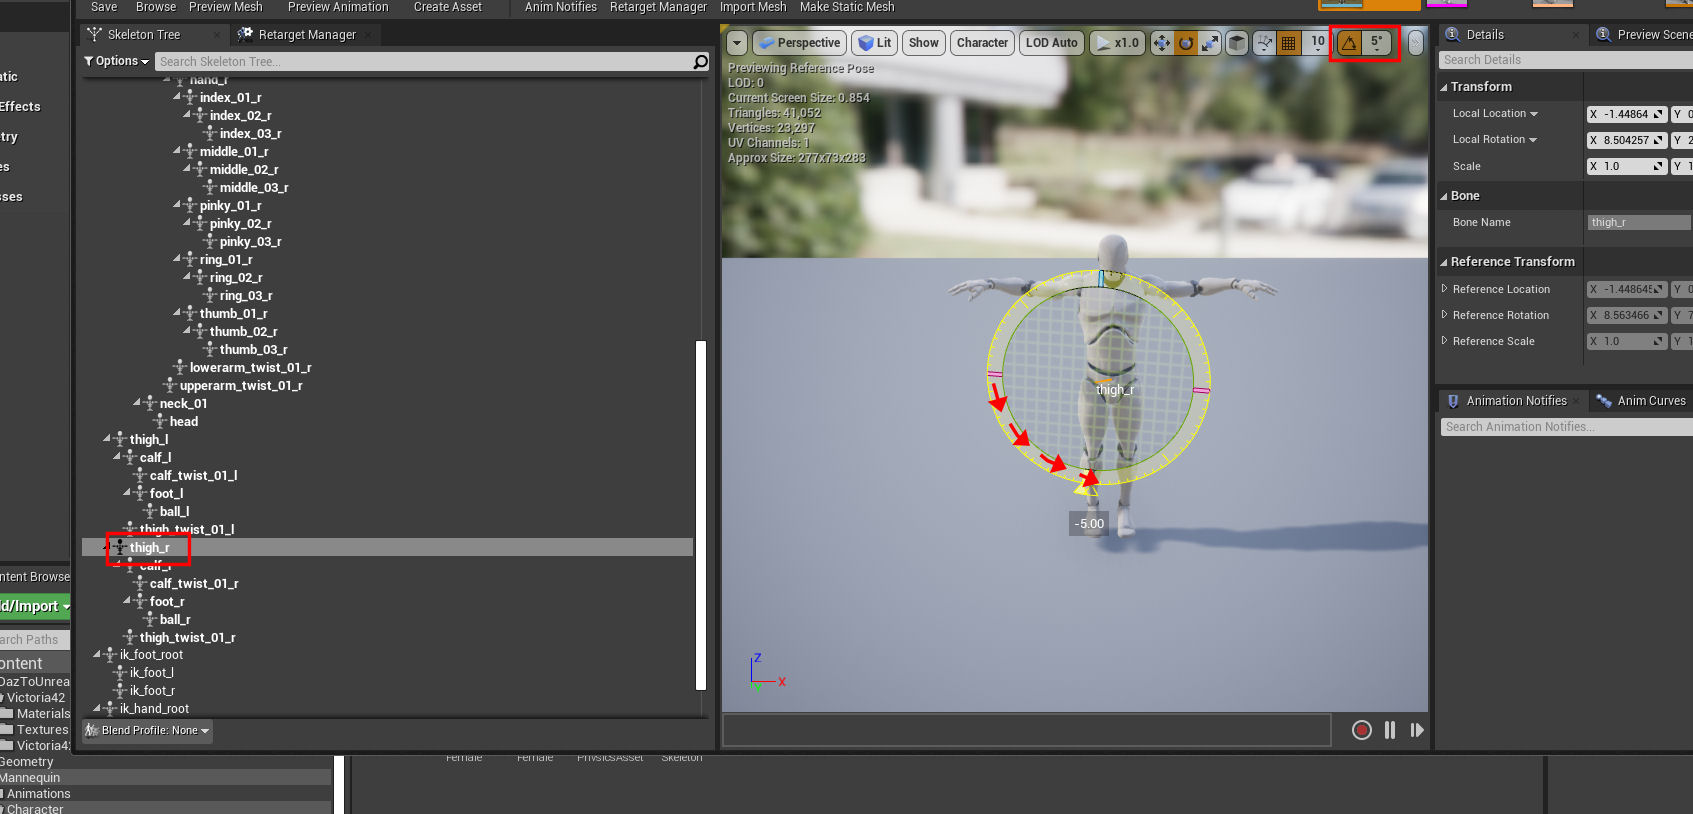
Set angle snap to 5 degrees. Select the Mannequin Skeleton's "thigh_l" and then "thigh_r" bones and turn them in and (once again grabbing the green dial) rotate them -5 degrees, making the distance between the two thighs smaller.
This next step I found I had to do after Daz3d had sent V4 over to Unreal, when it came time to actually retarget the animation(s), I found that V4 was rotated 90 degrees to the left compared to the UE4 Mannequin. And when you are using UE4's retarget manager, you want to get the Mannequin's pose as close to your character's pose as possible. So I then chose to rotate the whole mannequin skeleton to the left 90 degrees like V4's. Select the Mannequin Skeleton's root, rotate it counter clockwise -90 degrees to the left to match Victoria 4. This time grabbing the blue dial or Z axis.
The final step here is to go back to the Retarget Manager tab, and scroll down to modify pose, and choose "Use CurrentPose". And hit Save. Just like you did for V4.

While you didn't have to save the bone mapping for the UE4 Mannequin as no changes were made, you did move its arms and legs, and you rotated it 90 degrees, so you probably want to create a Pose Asset for it, just like you did for V4, which you can access from the modify pose button and search or select it.
Now on to the final part of the tutorial.
----------------------------------------------------------------------------------------------------------------------------------------------------------------------------------------------------------------------------
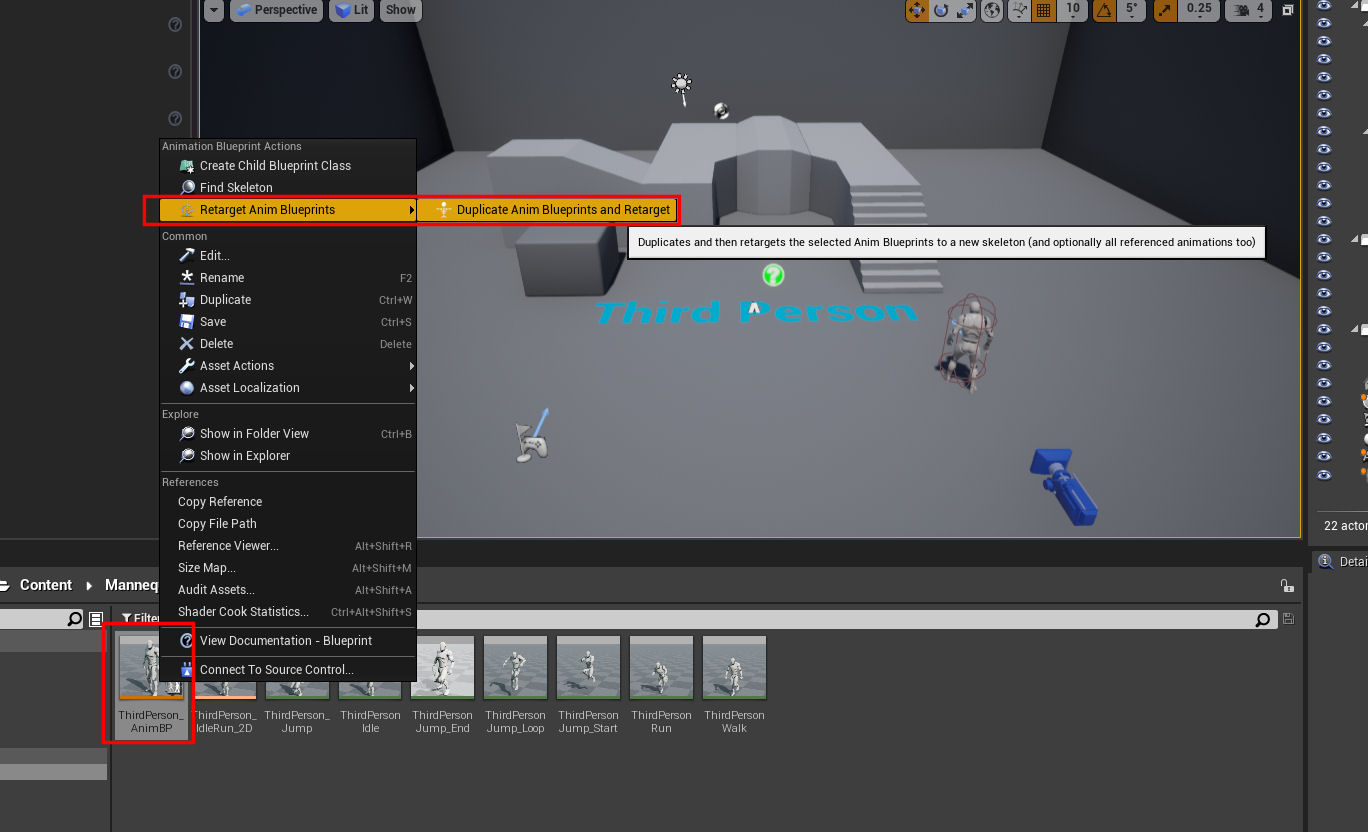
(Part 4) Retargeting Animation(s) and final steps. Now we are finally ready to actually retarget the basic animations of the third person template! And you can either retarget single animations, or in this case we are going to retarget the entire animation blueprint.
Navigate to the Mannequin - Animations folder. We are going to right click on that animation blueprint and choose "Retarget Anim Blueprints - Duplicate Anim Blueprints and Retarget."
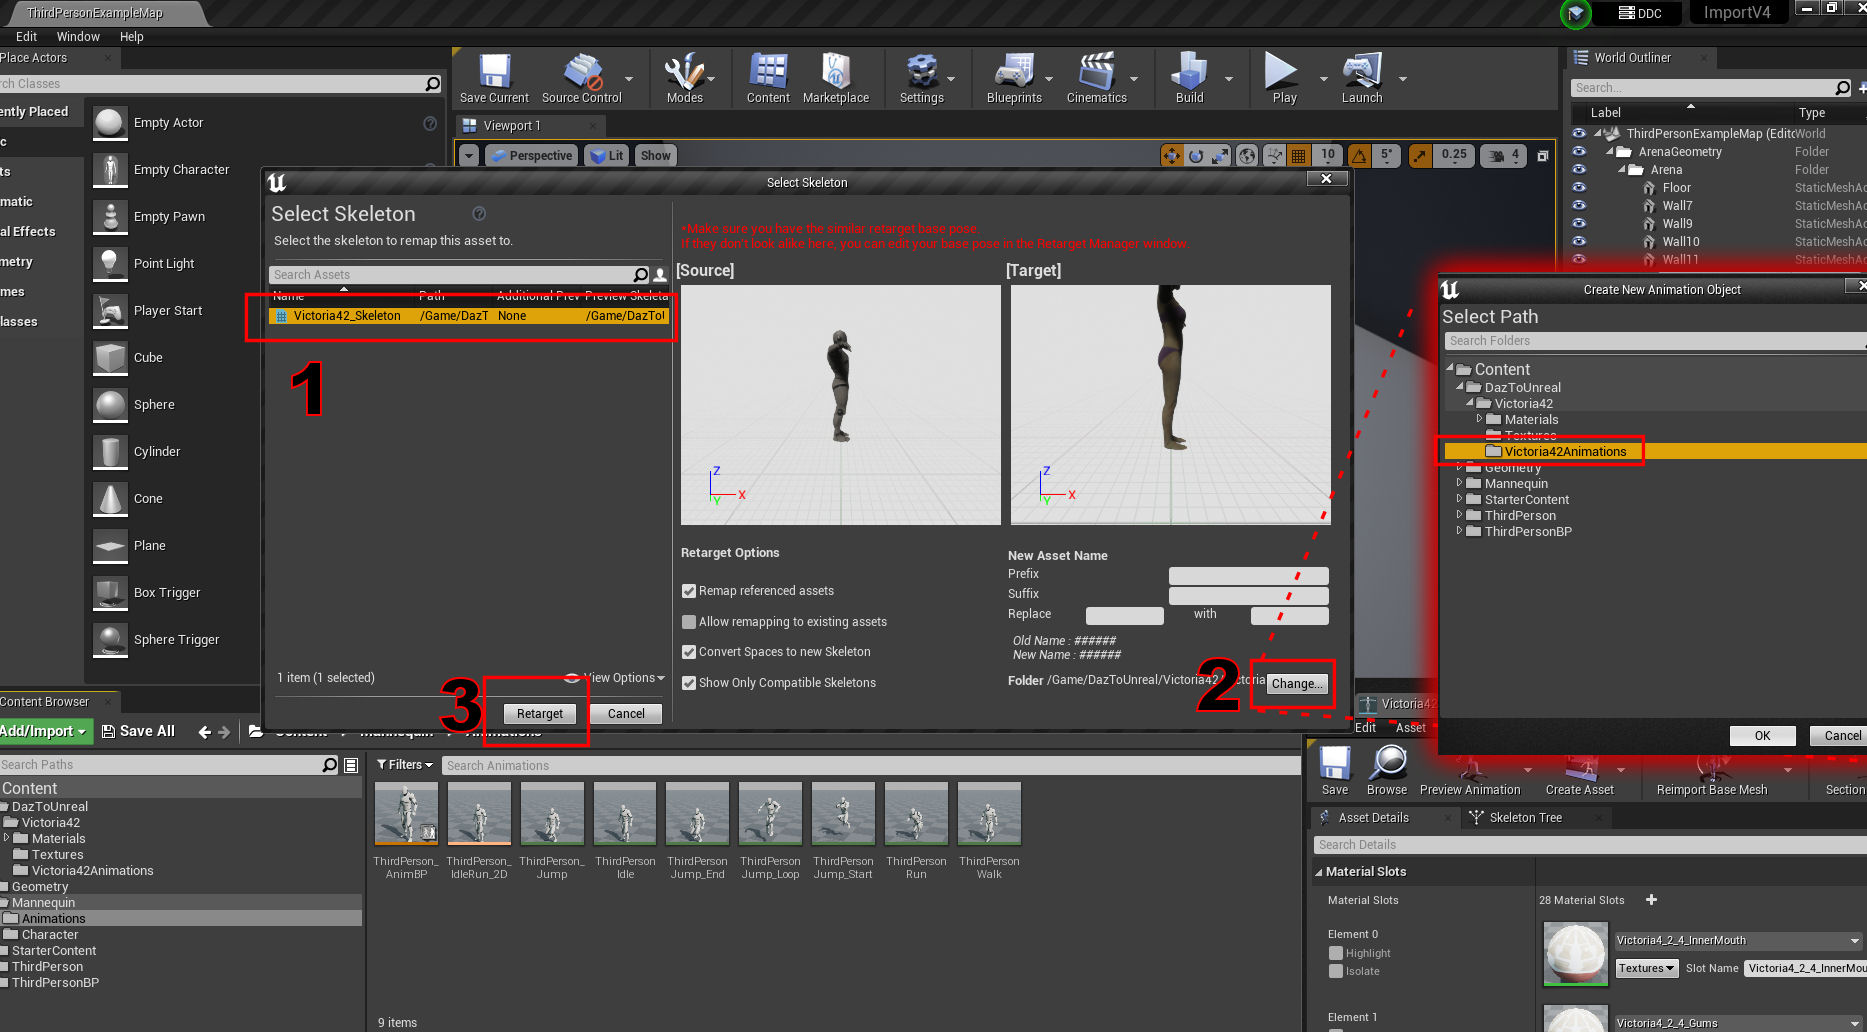
In this popup window, all you have to do is first select V4, and you should see her in the right window, next set your output directory by pressing the "Change" button and choosing the Victoria42 Animations folder you created earlier, and finally press the "Retarget" button.
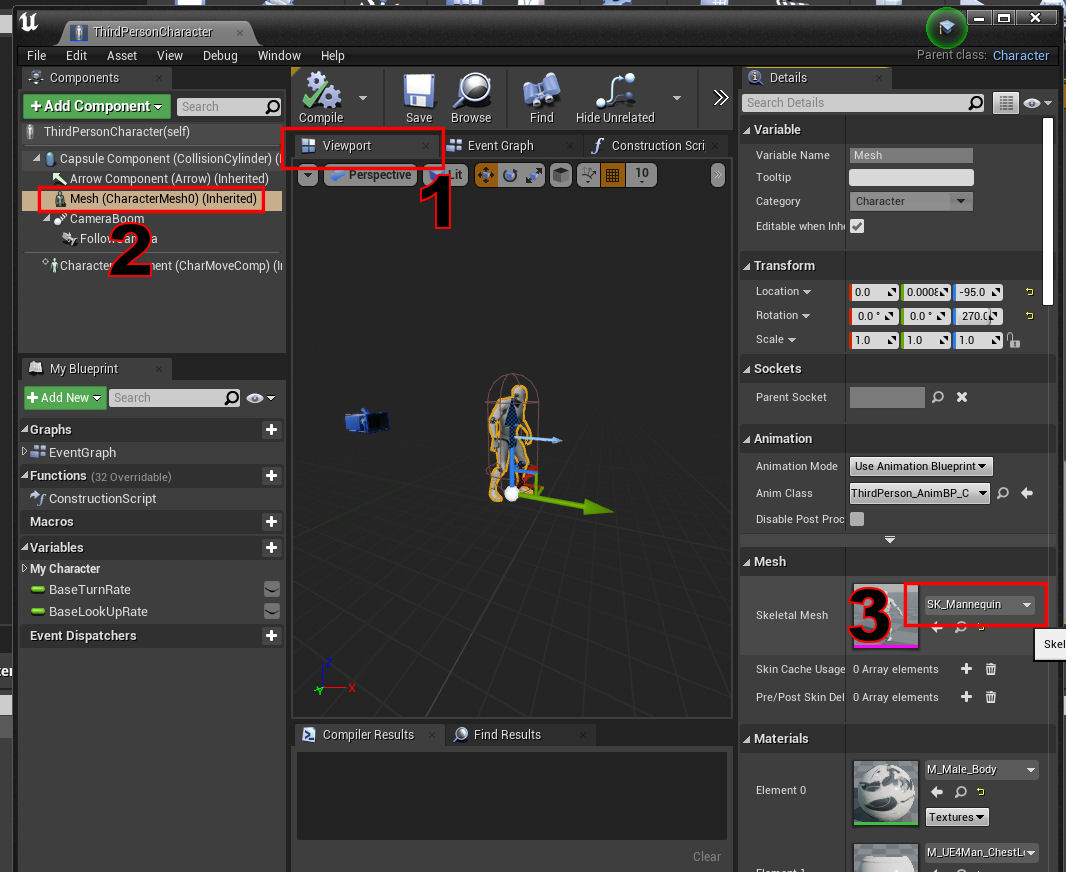
Now navigate to the ThirdPersonBP - Blueprints -and open the Third Person Character blueprint. And go to the Viewport tab. Now select the Mesh. In the Details panel, in Mesh, we are going to select where it says "SK_Mannequin", and we are going to trade that for the Victoria42 mesh.
The first thing you will notice is she is rotated the wrong way, and she is stiff as a board!
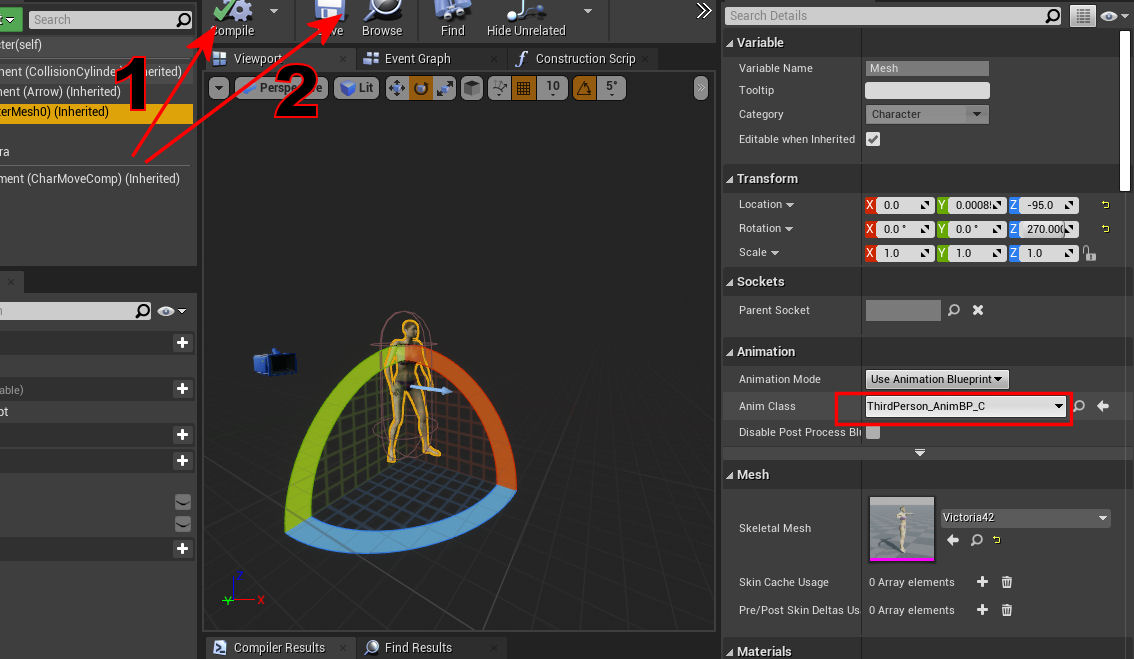
That is because she has no animation blueprint right now, but when we select our animation blueprint, it will be correct! Now press compile and then, save
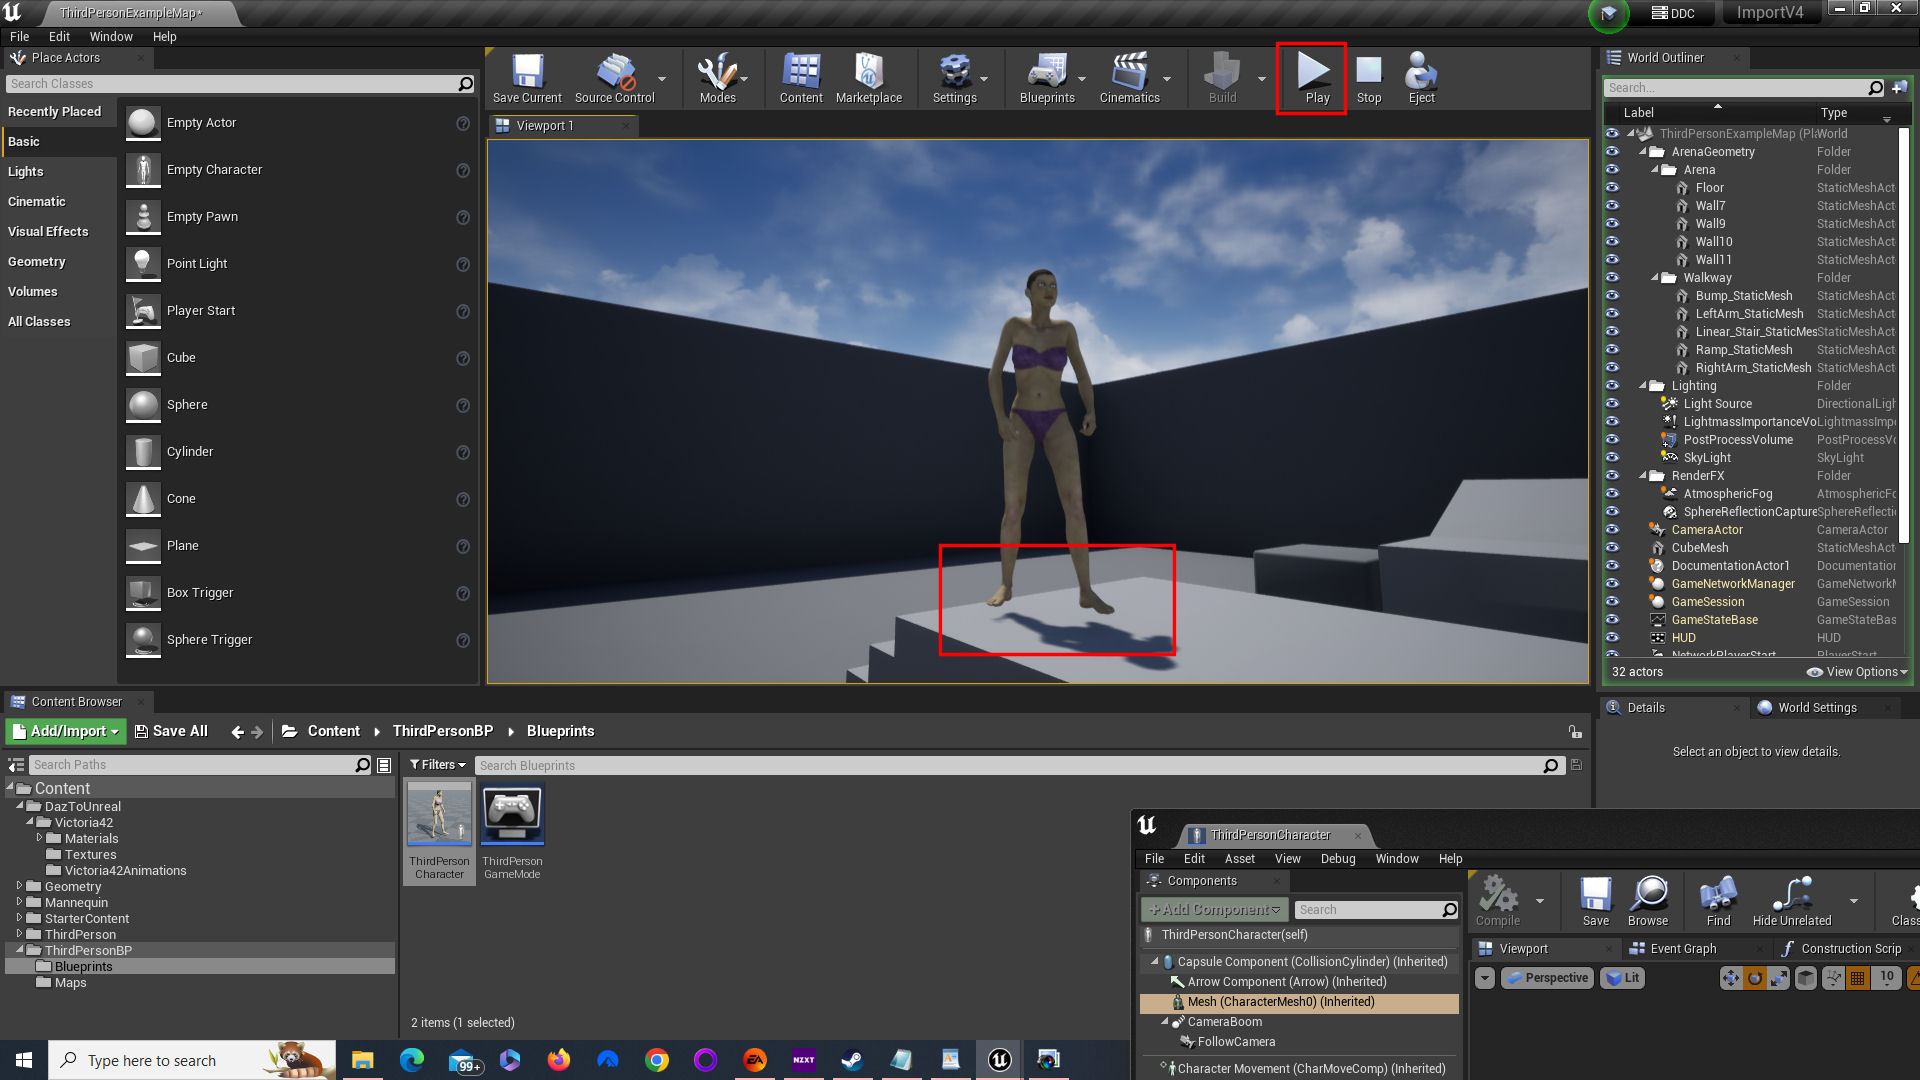
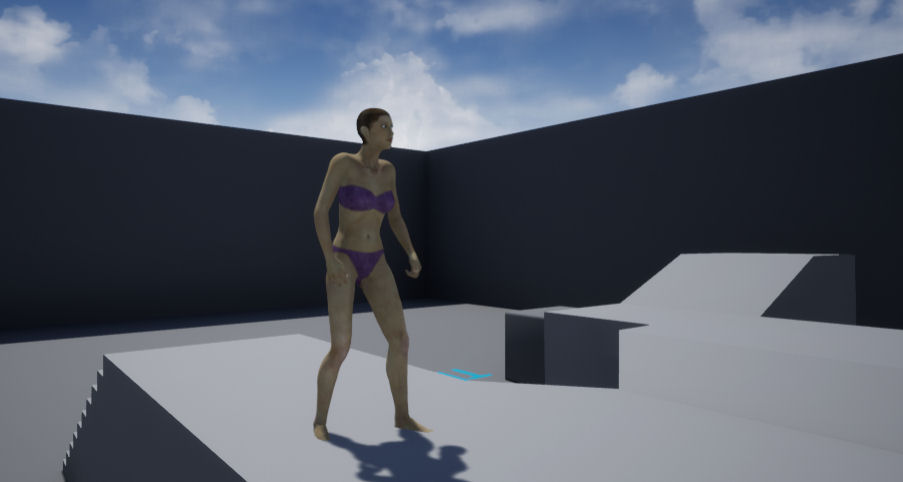
Navigate back to the main interface with the map and press play. Victoria 4 is in the game! Totally controllable! The issue I am seeing now is that the character's feet hover above the floor. So now we will try to fix that.
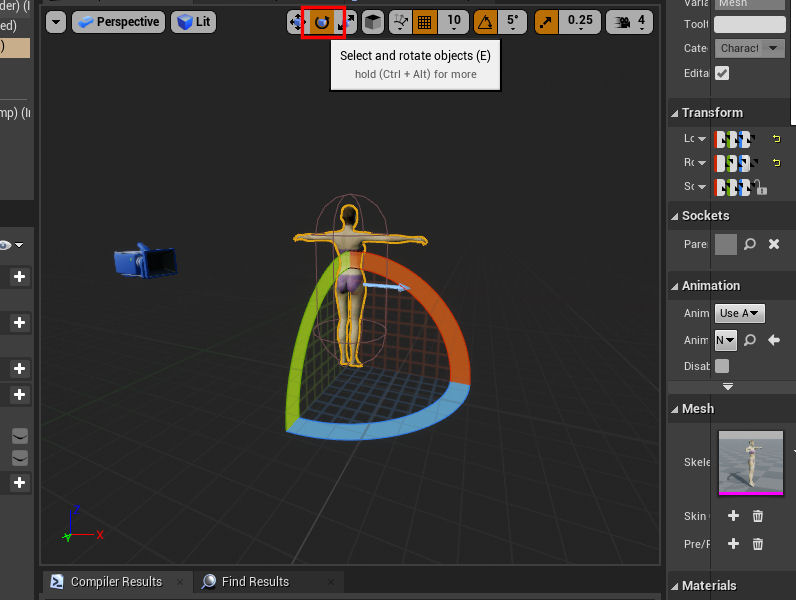
Go back into the Third Person Character bp, viewport tab, and select the mesh, then select the select and translate tool, then grab the blue bar and pull down and you will see it "snap" one time.
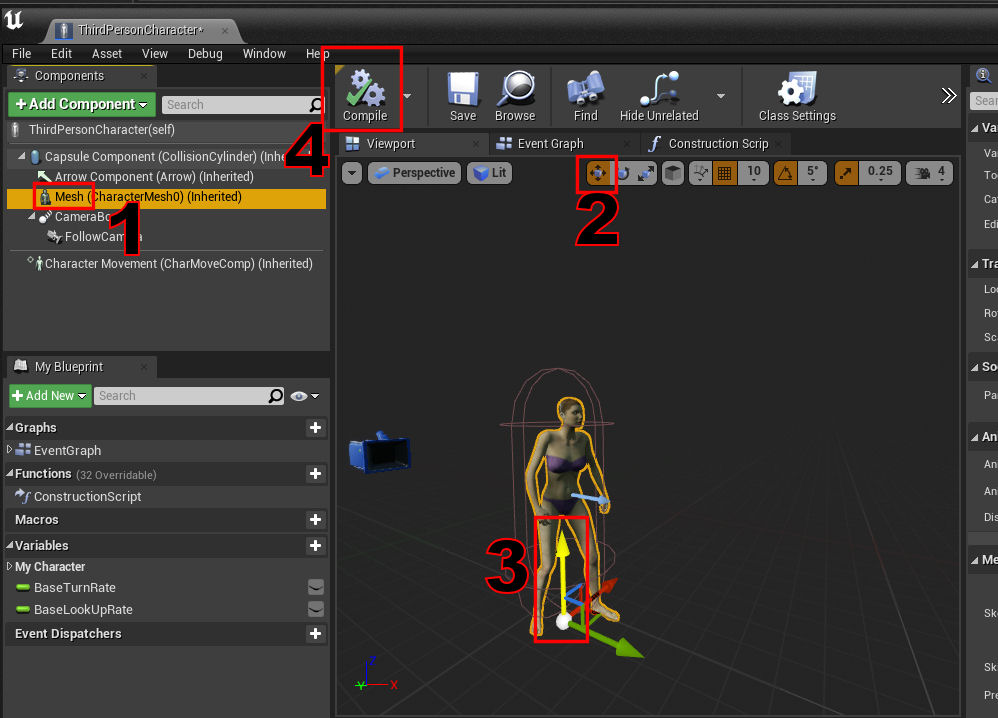
The reason it snapped is because the grid button was on.

Press compile and save again, and try to play again. It looks much better now, but now it is down a bit too much and the mesh goes into the floor. So simply do that again and this time turn the grid off, and pull it up just a hair. This will probably take trial and error to get it right. Just remember that if you happen to pull too high with the grid off you can always hit good ole "control+Z" to undo just like most programs.
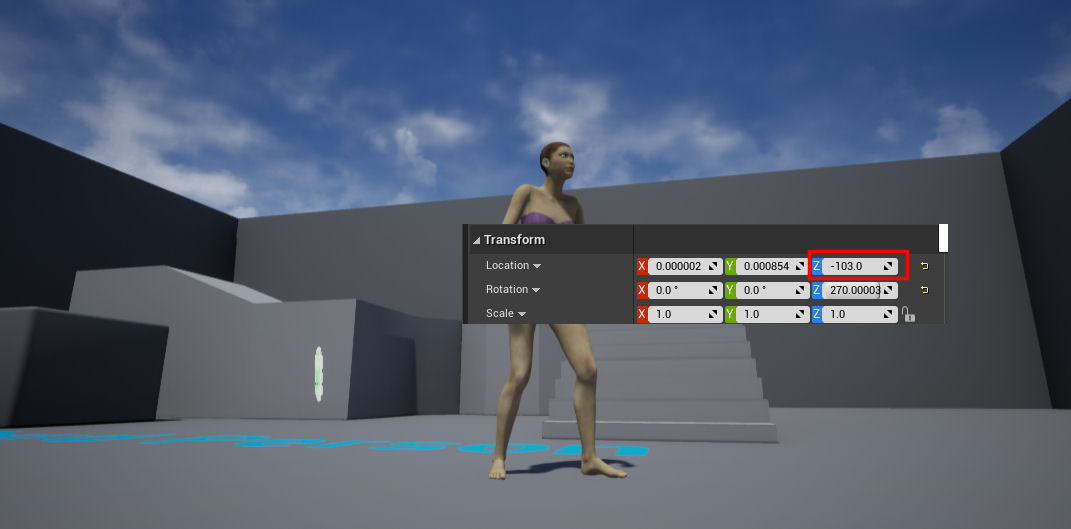
For those that like to live precisely by numbers, here is -103 on the Z. I think that is close enough.
And by the way, the exact same process can be used for Daz3d's Michael 4. The Unreal Engine 4 Mannequin has many things in common with V4 and M4 IMHO, while these things are essentially dated, there is a lot of content for them out there. Both free and paid. You should now be able to use any animation that the UE4 mannequin can use. And this opens up other possibilities as well, animations for V4/M4 that are created in Poser or Daz3D can be exported to and used in Unreal. Which could then be converted over to the UE4 mannequin? And I just tryed to open the "ImportV4" project in Unreal Engine 5.2.1, and it asked me to "open a copy", and when it finally loaded, I hit play, and it all looks and plays fine. M4 and V4 characters can now be fully used inside of the Unreal Engine! This was one of my more lengthy tutorials (but imho a very needed one), as always your donations during these trying times are much appreciated but not required, web hosting is not free!!!